Debugging Tealium iQ
Hopefully you’ve read parts 1 and 2, where I talk about some of the useful browser extensions and tools that I use for debugging tags. This part is specifically about debugging Tealium iQ and tags deployed through it. I’ll look at some tools and methods, and then we’ll take a dive into the utag.js file itself.
Make sure you’re looking at the latest version of your code
It may sound silly, but… we’ve all spent valuable time digging into the code trying to work out why the latest changes aren’t showing, only to realise that the code we’re looking at isn’t the code we’ve just saved.
It can take the Tealium CDN a few minutes to update after you’ve done a publish, and therefore it’s always worth checking your looking at the right version of the code.
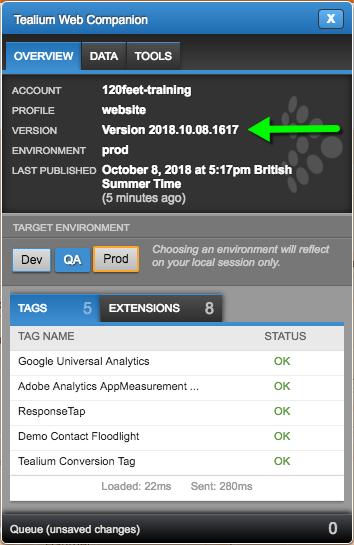
Each time you publish you get a timestamped version number (even if you change the version label from the default timestamp). Make a mental note of that when you hit the publish button. Remember that the time is always in GMT, so if you aren’t, then you’ll need to know the time offset.
There are a number of ways of checking, and a couple of ways of speeding up the process:
- Use Tealium Web Companion Chrome extension:
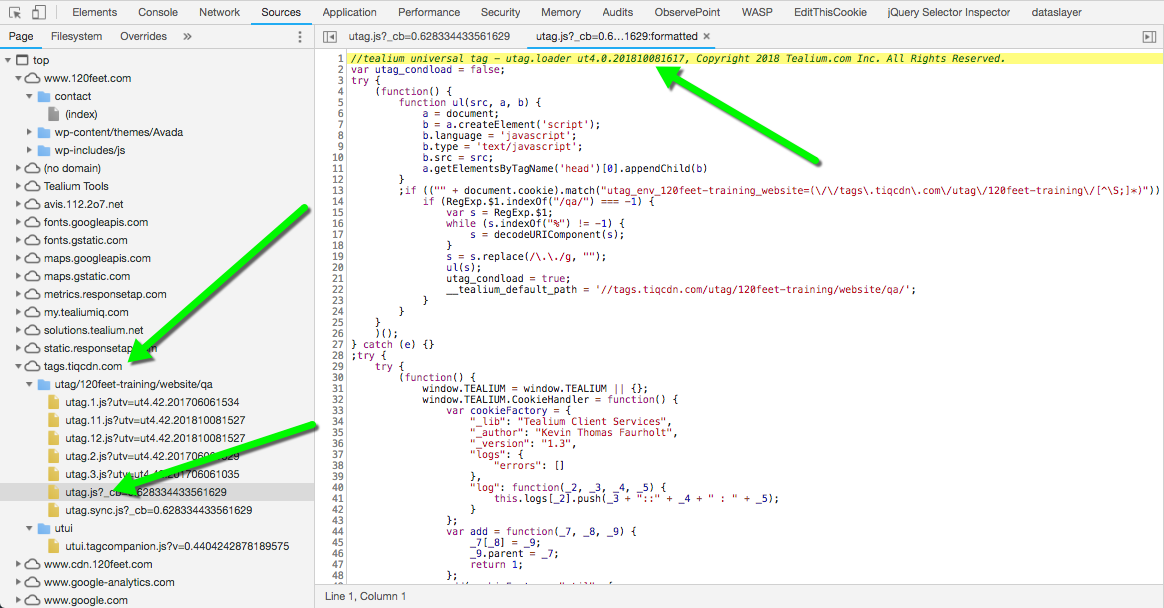
- Check the first line of the utag.js file. You can either look at it in the Sources panel:
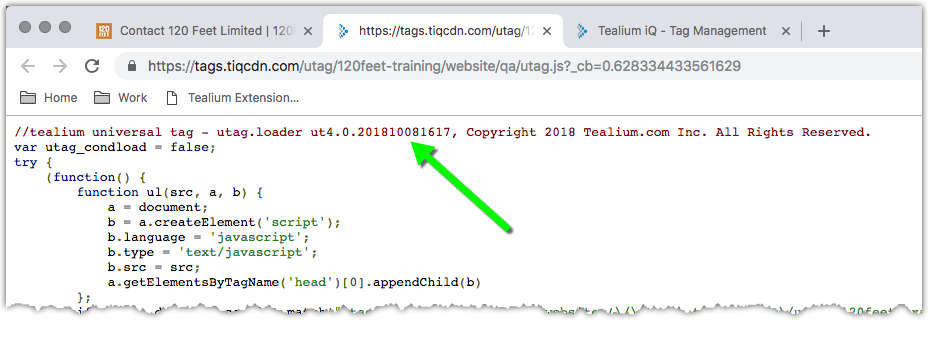
Or open the file in a new tab (right click in the network panel and select “open in new tab”) and then look at the first line:
If it is taking a while to update then you can try forcing a refresh. With DevTools open, right click on the refresh button and select “Empty Cache and Hard Reload”. This will force the browser to go to the server to get the latest version of all files:
![]()
Or you can try using the Environment Switcher to change environment; if you’re working in QA then go to Dev and then back to QA, if you’re working in Dev then go to QA then back to Dev. I find this tends to clear out the cache and force the latest version.
If you use a two step workflow, with just QA and Prod, then you can publish to Dev/QA together and just flick between these two, rather than changing and then changing back.
Or, final option is just to open the utag.js file in a new tab, open dev tools and just repeatedly hit “Empty Cache and Hard Reload” for a few minutes until the new file comes. This can also be a useful “go and make a cup of tea” opportunity.
Know your data layer objects
Knowing the difference between the four names of the data layer can save a lot of time, errors and confusion. (Disclaimer – your site set up might not be exactly the same as this. Some sites, especially ones with SPAs, can be slightly different.)
utag_data is the data layer that is defined on the page, usually populated by the server side page code. Changes to this are done by the site developers, and are likely to be tied to IT release schedules
utag.data is the data layer after it has been processed by the Tealium code. It consists of a combination of the utag_data object(s), DOM information, first party cookies, querystring parameters, other on page JS variables, and potentially Audience Stream profile data. Any changes defined in the extensions are applied to this object
b is the name of the data layer in any tag scoped extension. It is a locally scoped copy of utag.data. Any changes you make and save to this object are not available outside of this particular tag.
d is the name of the data layer object within the code of the load rules. You will very rarely need to know or use this, but for the sake of completeness…
Know your Tealium timeline
A frequent source of problems in asynchronous tagging is timeliness of operations. Tags are fired asynchronously, so you don’t actually know when they are going to fire. But they are reliant on the data layer, which is (usually) set at the start of the render by the page. But it can be updated by code in Tealium…
The timeline of the utag code looks something like this:
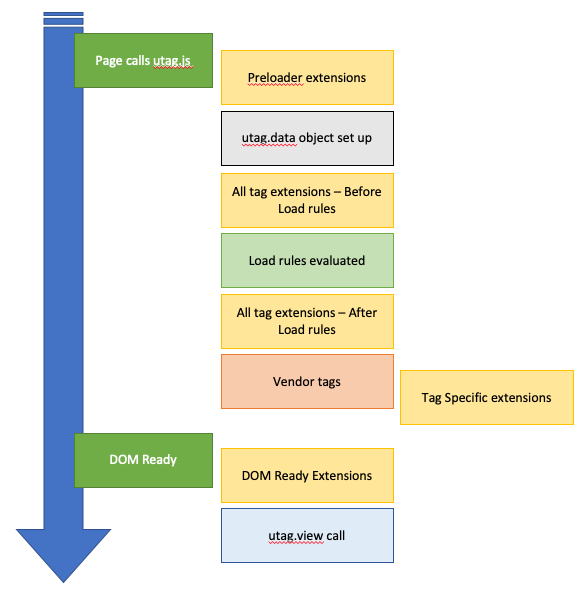
As you can see, extensions (in yellow) can fire at one of five points.
Preloader: This really does load before everything: there’s no utag object, your processed data layer won’t exist as utag.data, although you can access utag_data (the data layer as defined on the page).
The most useful thing to do here is to update tealium configuration, or add global functions that you want to be able to use across all the tags. I usually add a Cookie Handler library that Tealium supplied way back in 2013ish which gives some very useful get/set/overwrite/delete functions for dealing with first party cookies.
All Tags: Extensions here will update utag.data for all tags. You can specify if you want them to run before or after load rules. The default is to run after. It really should be before. I can’t think of any use cases for having one value in the data layer for the load rules, and then changing it to something else for the tags.
Scope to vendor tags: Extensions here will use and update the b object, a locally scoped copy of the utag.data object. Changes to this object will only apply to this tag. The other tags will get the original values.
DOM Ready: These extensions will fire on the browser DOM Ready event. This may happen before or after All Tags. Use it to add event handlers and other things that need information from the rendered page. DOM Ready extensions only fire once, as there is only one DOM Ready event from the browser – they will not run again on event link or subsequent view calls on the same page.
Verbose Debugging
Say you’ve just added a new tag, but when you hit the page, the tag isn’t firing. How do you find out the problem?
First up, check the console for errors. Did you make a typo in the code?
Then, check the load rule conditions. Check where you are setting any data that is used in the load rule (refer back to the timeline above).
Open the Console and look at the data layer. Do the values in the console match the load rule? Remember case sensitivity.
If that all looks right, then it’s time to dig into the Tealium debugging information
Open the console and enter utag.rpt
Open the object that is returned. It may just look like a long list of numbers, but this tells you how everything has been evaluated.
This tells you for each object in the profile whether it ran or not.
The numbers will match the UID numbers in the UI. The prefixes tell you what type of object:
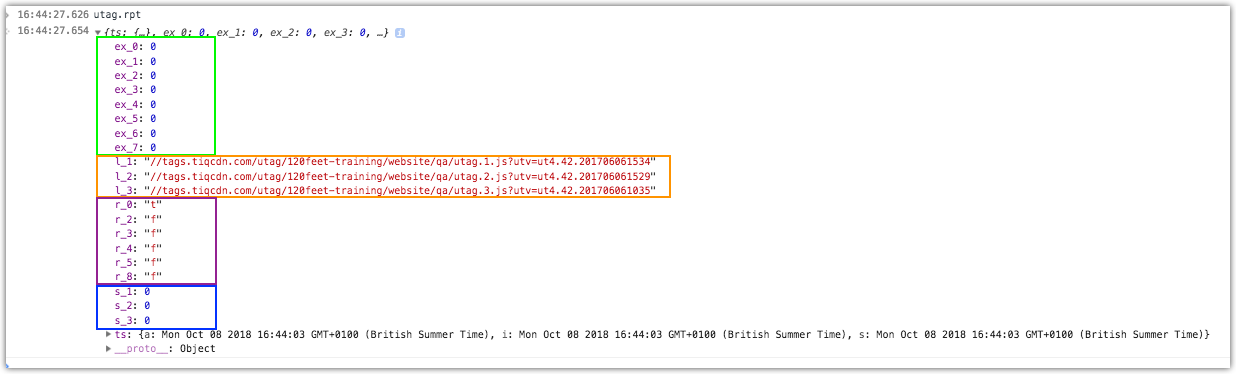
ex_ objects are extensions. 0 means it ran ok. 1 means there might have been a problem
l_ are Loading the source for the tags
r_ is the load Rules. t is true, f is false. r_0 is the “all pages” rule
s_ is the Sending of the tags. s_1: 0 means tag 1 was sent with no errors
ts is timestamp in unix time
You can see in this example all my extensions ran OK, three tags were loaded, only the “all pages” load rule was “true”, and all three tags were “sent”.
Unfortunately on this page, I think load rule 8 should be true and another two tags should be firing.
Something in my load rule isn’t right then. The load rule is a simple check of a data layer variable:

To find out what is going wrong, type this into the console: document.cookie = “utagdb=true”; Press enter, then clear the console (the little “no entry sign” icon), and then reload the page.
You’ll get a whole load of debugging information written to the console:
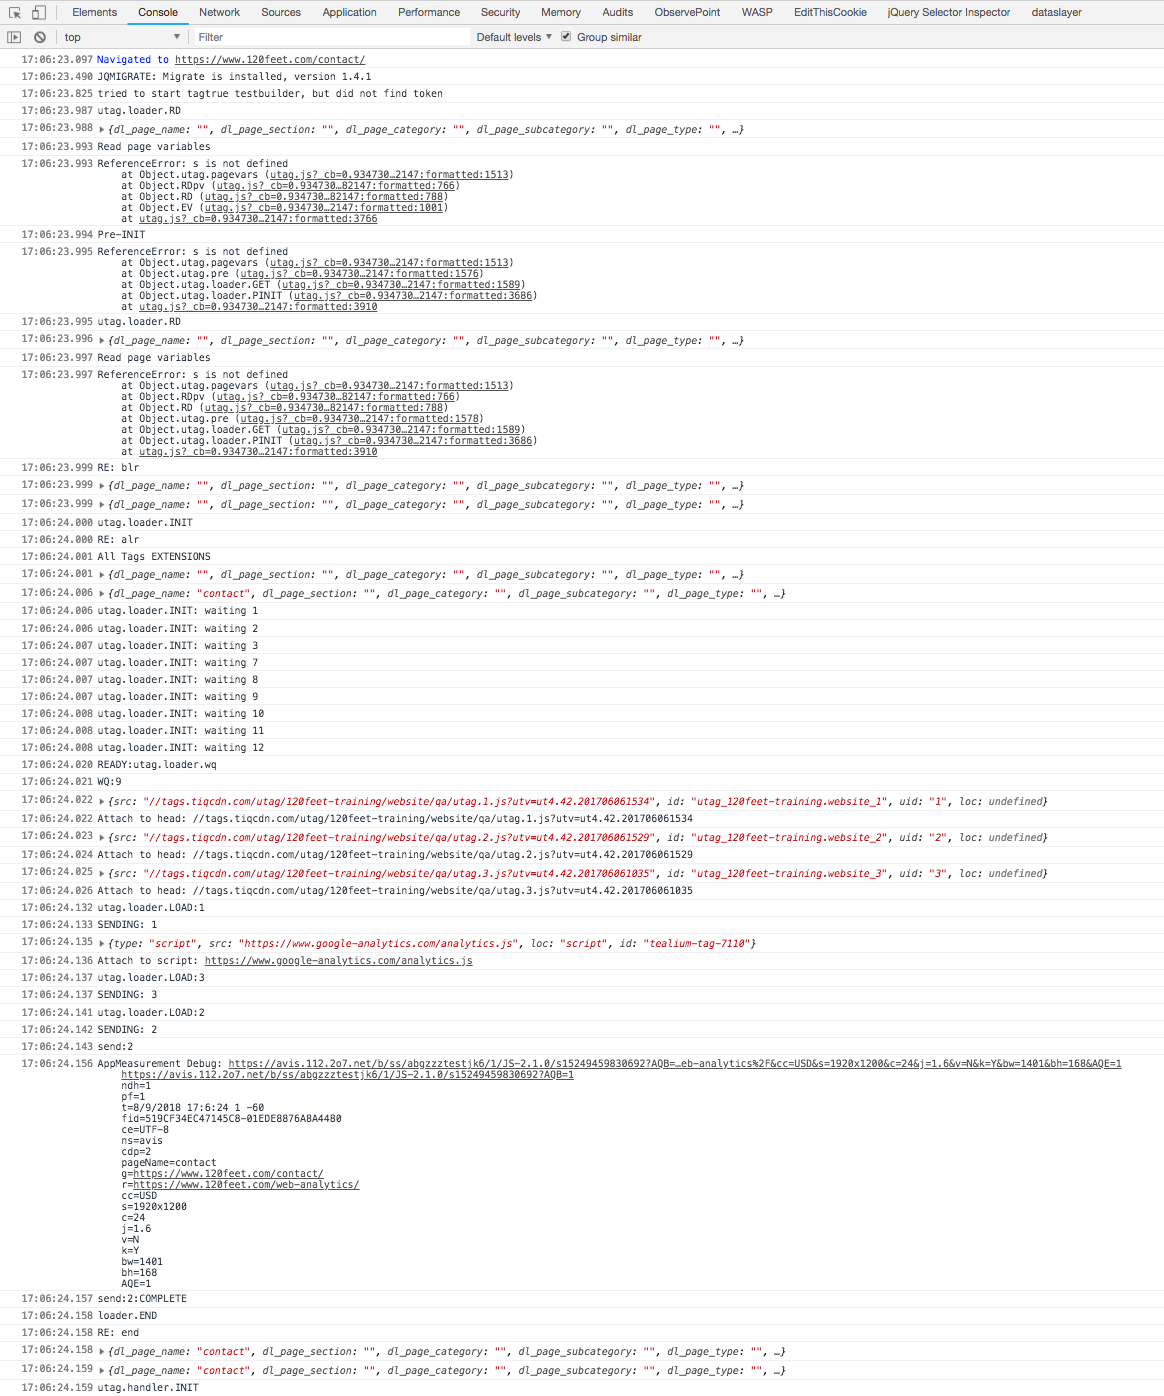
Luckily this is in a sensible order, with plenty of indicators to tell you what’s going on. It’s actually fairly easy to read through. The data layer is repeatedly logged, so you can follow it through and see at what point things have been set. A few abbreviations that are used:
Blr = before load rules
Alr = after load rules
Wq = wait queue
You can easily follow through the preloader, load rules, tag load and tag send calls. And you can see from the screenshot that my data layer isn’t populated at the point where the load rules are evaluated (at 17:06:23.999 in the list).
So this is why my rule isn’t true, because the data layer isn’t set. So I can either get my Devs to update the site so the data layer is available earlier, or I can change my load rule to use something that is set (ie something DOM related, such as the dom.pathname).
Know your way round the utag.js file
The utag.js file is quite a beast, and I’m not suggesting you learn every little bit of it. It has been minified so a lot of the functions and variables have single letter names, which can (in places) make it hard to work out what it is doing. But there are certain important bits that you should know how to find, and the general patterns in the code that are reused.
Load Rules
The load rules are defined in a function called utag.loader.loadrules. If you search for this you’ll see each load rule declared as cases in a switch statement. Notice each statement is a conditional statement which puts the return value into an object called c.
(For more information on the “|=” bitwise OR operator, see here)
Extensions
Extensions are defined in an array of functions called utag.handler.extend. Each extension is declared as its own function. This means that an error in one won’t stop the rest from functioning; it also means that variables declared in one extension aren’t automatically available in another.
Notice each function has a and b passed in to it. A is the type of call (“view” or “link”) and b is a copy of the data layer (utag.data). You can use b in your extensions, but if you save something back to b, it will only be available within that extension (because each new extension has a new copy of b passed in).
Conditions on an extension are conditional if statements, and multiple conditions are all wrapped up into a single if statement (with potentially lots of && and || operators).
Tags
After the extensions function is a function called utag.loader.initcfg. This function sets up the details for each tag. You won’t see the tag code as that is in separate JS files, but you can see the load rules (either 1 for always load, or a pointer to the array containing all the load rule values). You can also see the version number/timestamp which can be useful if you’re not sure if it is loading your latest changes.
DOM Ready Extensions
DOM Ready extensions are in a function called utag.loader.EV. The extensions are run one after the other. Rather than each one being a separate function, they are all executed one after the other.
Ben Stephenson has worked as a consultant for 120Feet for nearly three years. He has ten years of development experience on ecommerce websites, and five years of Digital Marketing experience as an ecommerce manager looking after a large multinational collection of websites for a Travel and Tourism company. In his spare time he plays guitar, builds with Lego and takes photos (sometimes featuring the guitar or the Lego).