We have recently implemented the Facebook purchase “tag” using the Adobe Server Side tagging technique, Adobe Experience Platform and a new component in Adobe Launch called Data Collection. We were asked to implement this to sit alongside the client side JS pixel.
(For other clients, we have done something similar using Tealium EventStream and AudienceStream which have been available for several years.)
Client side tagging
Client side tagging is the standard and typical approach.
After the site has been served from the webserver (1), a call is made to the Tag Manager (2), which returns a load of code depending on the state of the data layer at that point.
The browser then makes a series of calls to third party vendors (3, 4, 5), sending data about the current page.
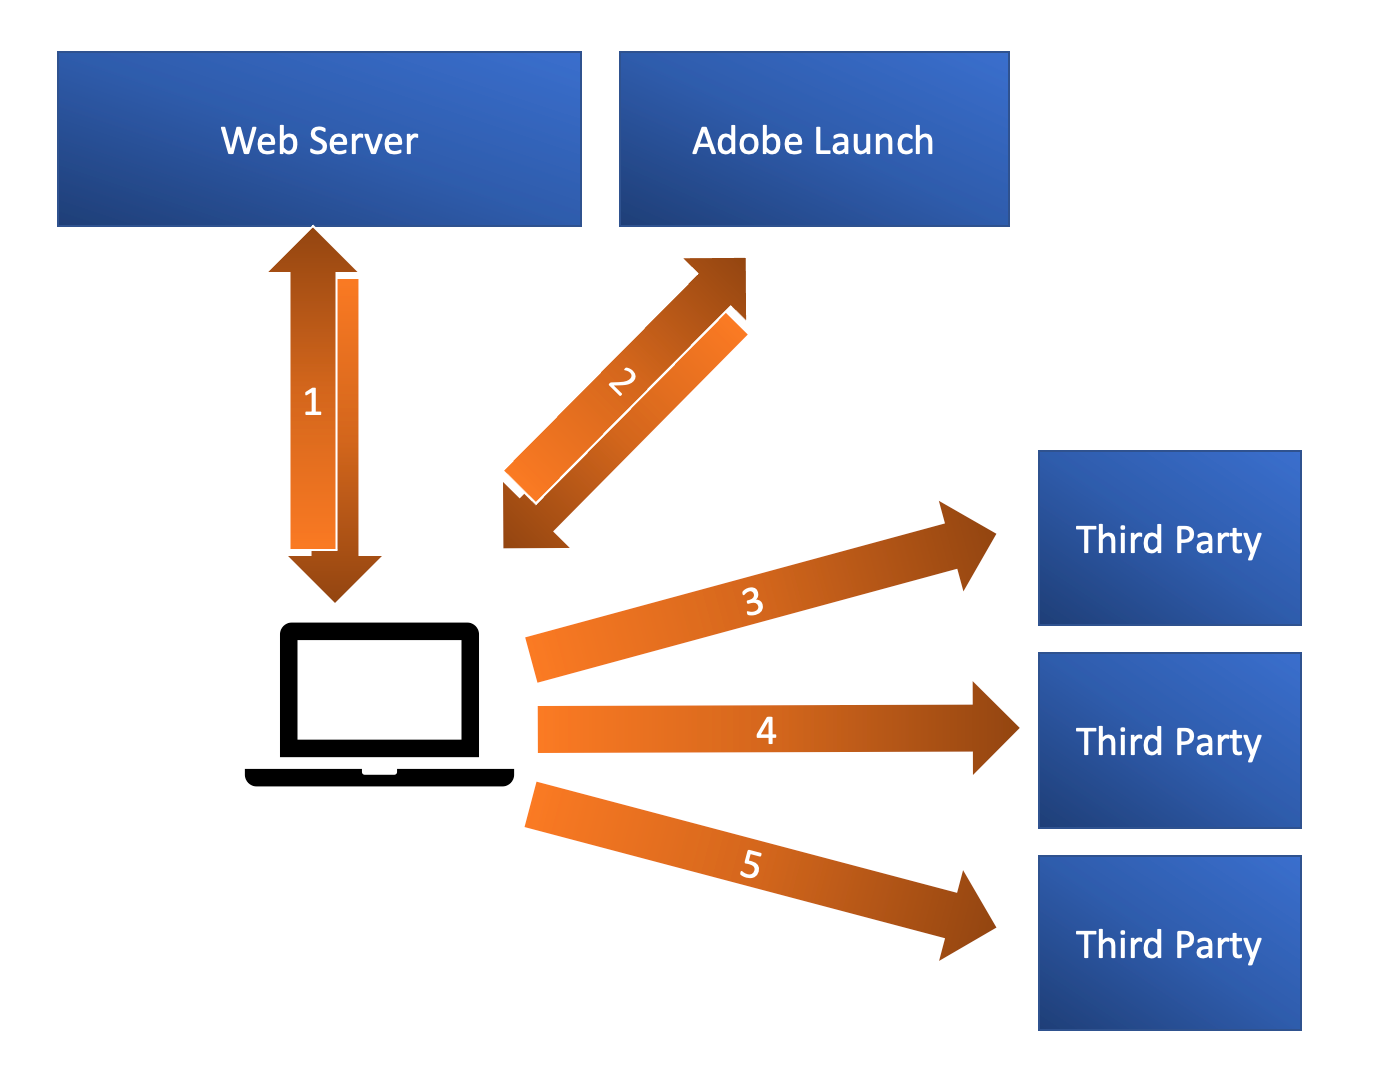
Client side tagging illustration
Server Side Tagging
Server side tagging removes the middle step, and the vendor tags are loaded from the Tag Manager platform.
The browser still makes a single call out to the Tag Manager Platform (Tealium or Adobe Experience Platform), passing the data layer (in Tealium’s case) or a JSON object with a subset of the data layer (in Adobe’s case).
The data is processed against tag load rules and any appropriate tags / APIs are called.
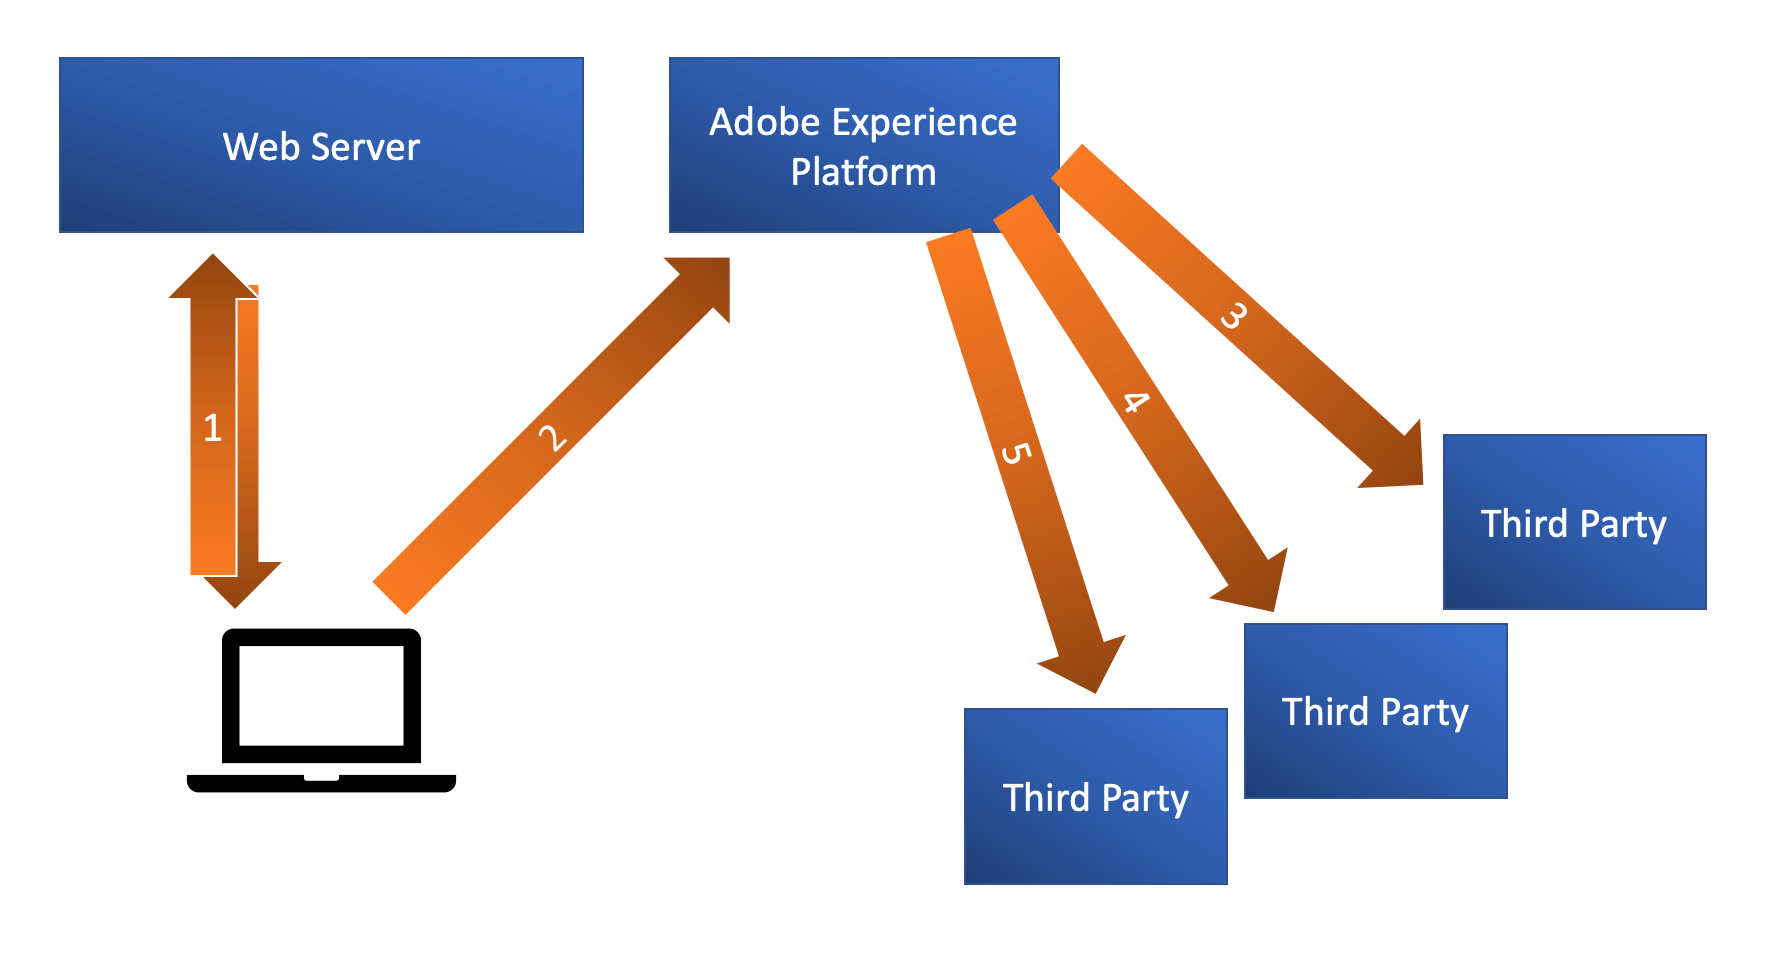
Server side tagging illustration
Client Side and server side main differences
There are some notable differences between the two approaches.
A server side configuration does not have access to the browser. So, if something is not in the data object passed up, then you can’t scrape it from the page like you can with a client side JavaScript implementation.
Also, because the “tags” are being processed on the server, you can’t step in to the code using a browser debugger. You can see the message being sent, but that’s all. The Tag platform provider will have some form of debugging/trace tool that can be used to check the status of the messages.
Server side tagging means that the data collection should be more robust because it reduces the chance that the customer browser or connection stops a tracking tag being fired.
Whilst with a standard asynchronous tagging set up, there could be a few seconds between the page being loaded and the tag being fired, during which time the user could navigate away from the page or press the Stop button, their device could lose signal, or an adblocker could step in and stop third party tracking calls.
This does raise an interesting privacy question. If the customer opts out of tracking, should this call be made at all? If some of the tags that are triggered from the server side are “analytics” cookies, and others are “advertising”, how can we make sure that only the tag categories to which the customer has opted in are triggered? AEP offers a way to handle this.
How to implement Server Side Tagging with Adobe AEP
The configuration with Adobe AEP and Launch Data Collection has a number of parts that need to be configured. Here is how we did it:
The XDM Schema
First you need to set up the schema of the data object that is going to be sent / received. This is configured in Adobe Launch / Data Collection, then click Schemas from the left hand menu.
The schema is constructed of predefined sets of properties and custom attributes, either inherited from a Class or grouped in a Field Group. In our example, we have inherited the XDM Experience Event class.
The Adobe XDM Experience Event class imports standard event properties such as an ID, eventType and timestamp. Adobe’s Commerce Details field group imports the commerce and productListItems groups and then the custom fieldgroup we set up with the client includes client specific fields.
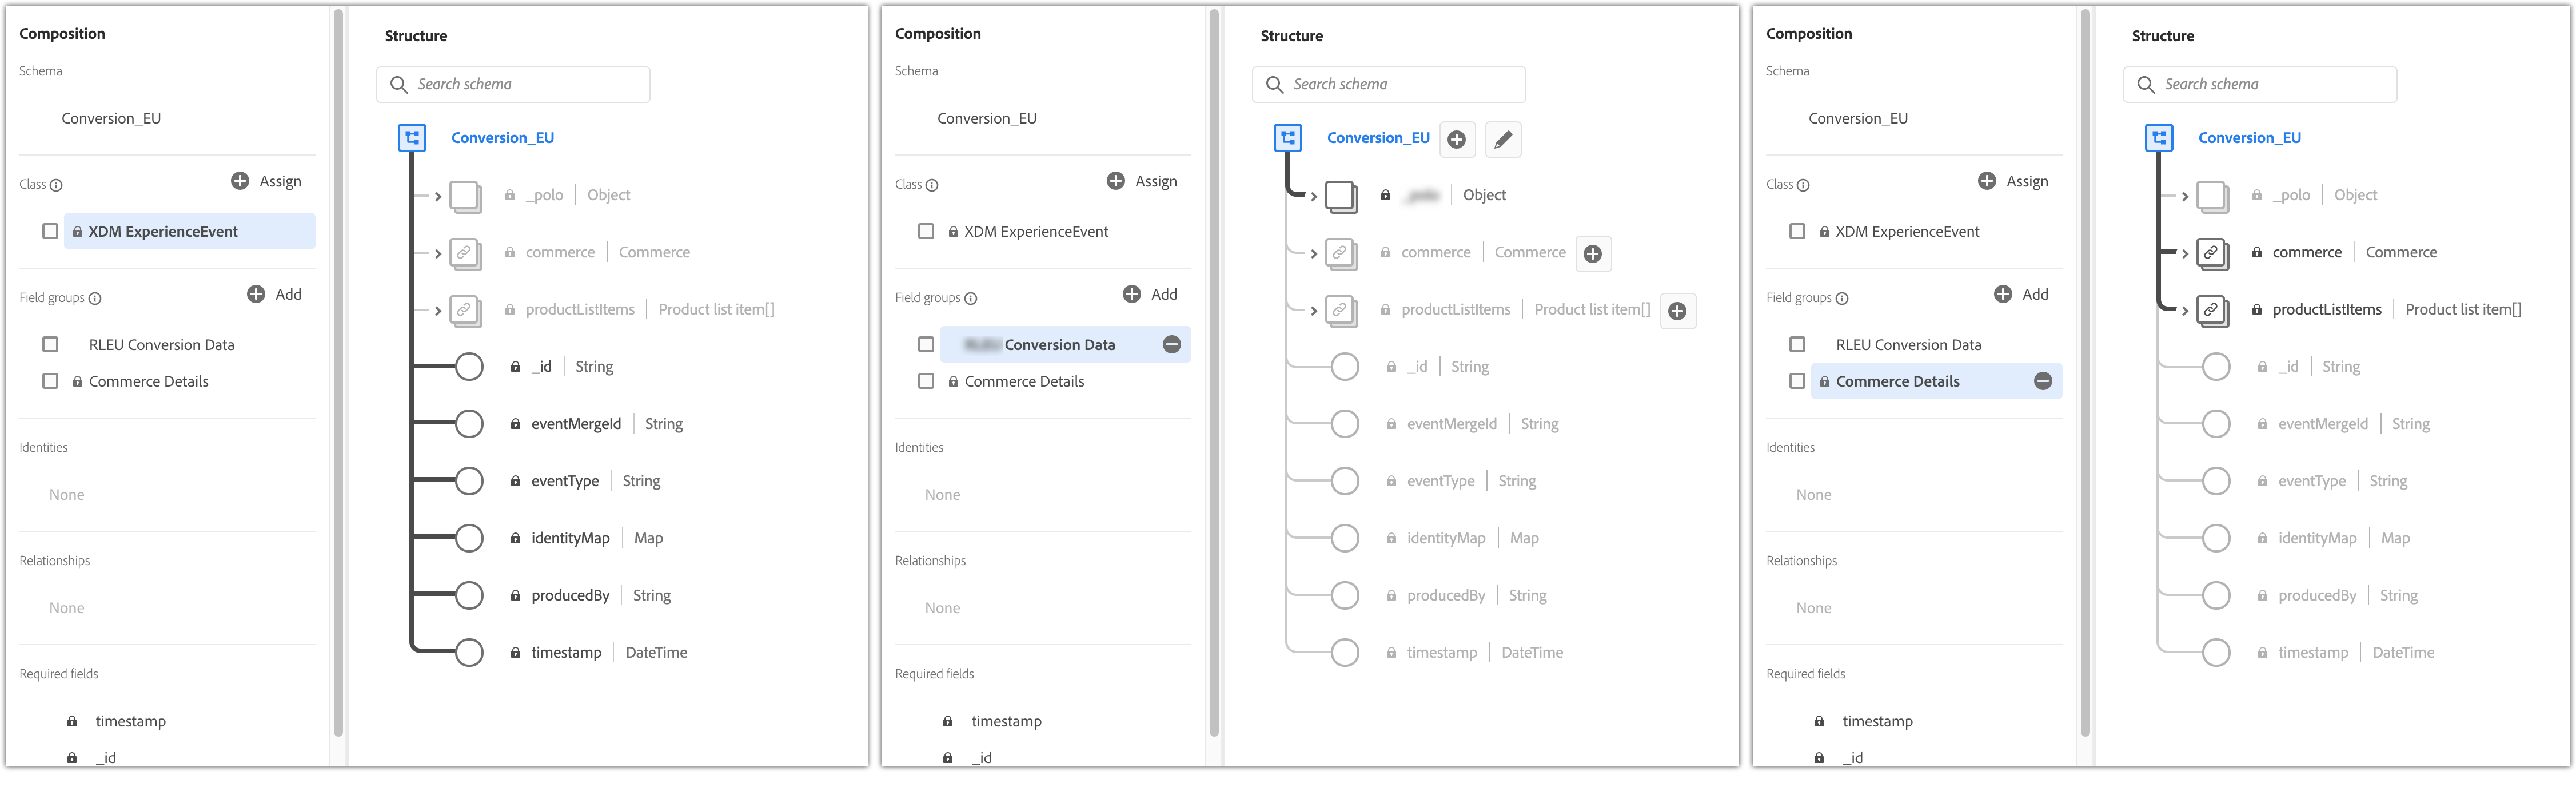
Adobe XDM Schema workflow
Because the use case for this test event was the purchase event being passed to facebook to mimic the client side pixel, we added the fields that needed to be sent to facebook. When we revisit this with a view to replacing more events – for both facebook and also analytics, and any other tags that want to move to server side – we will need to expand this schema to include all the fields that are passed on those events.
Creating a new schema is done using the “Create Schema” button in the top right of the screen.
Most items in the schema should come from the XDM Experience Event class. Additional fields can be added either as a group (a Field Group), or individually. Some thought should be put into the structure of the schema, with common fields grouped together, meaning they can be reused in a different schema without having to reconfigure them.
There are predefined field groups available, but adding too many may result in a large and unwieldy schema that becomes more work to maintain/code for.
You can also add validation rules to the schema fields to ensure data coming through to the data set is clean before it is accepted and processed.
It is also worth noting that to move a schema between the sandbox and production environments, you need to set up an API project (with appropriate authentication) and then use the API to copy it.
Data Set
The next step is to set up the Data Set that is going to be passed. This is done in Adobe Experience Platform, found in the top “nine dot” menu:
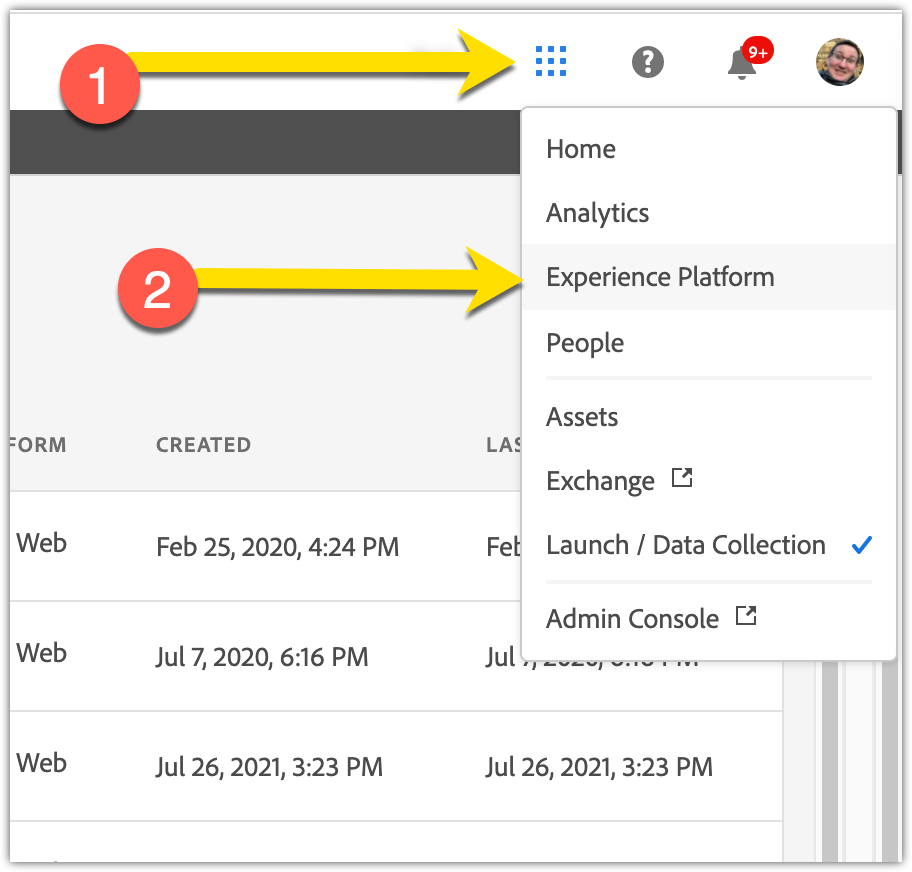
Accessing the Adobe Data Set
A data set is a collection of records and are used for the storage and management of data within AEP. A data set is mapped to a schema and you can have multiple different data sets mapped to a single schema. For example, you could use a different data set for different brands or territories, all mapped to a single global / company wide schema.
Adobe Experience Platform data set user interface
When you create a new Dataset, you can choose to create it from a CSV file or from a schema. Select the schema that was created in the last step.
Datastream
The Datastream is configured from the new left menu icon under Launch / Data Collection:
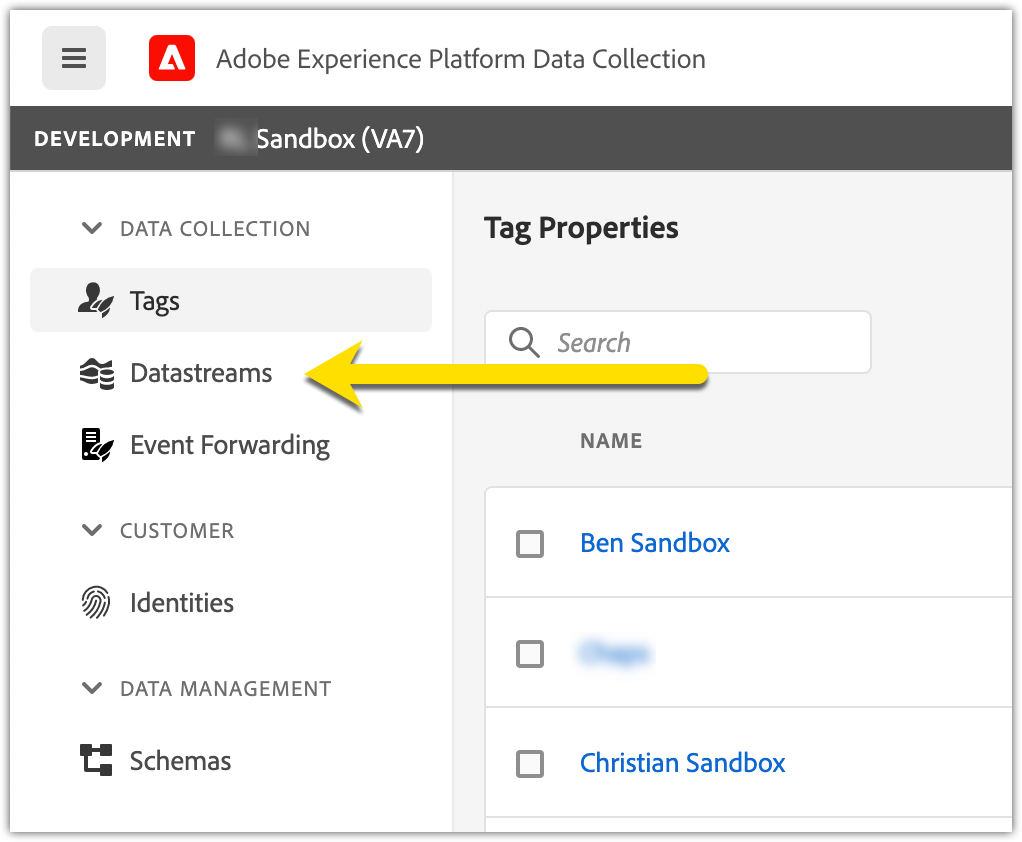
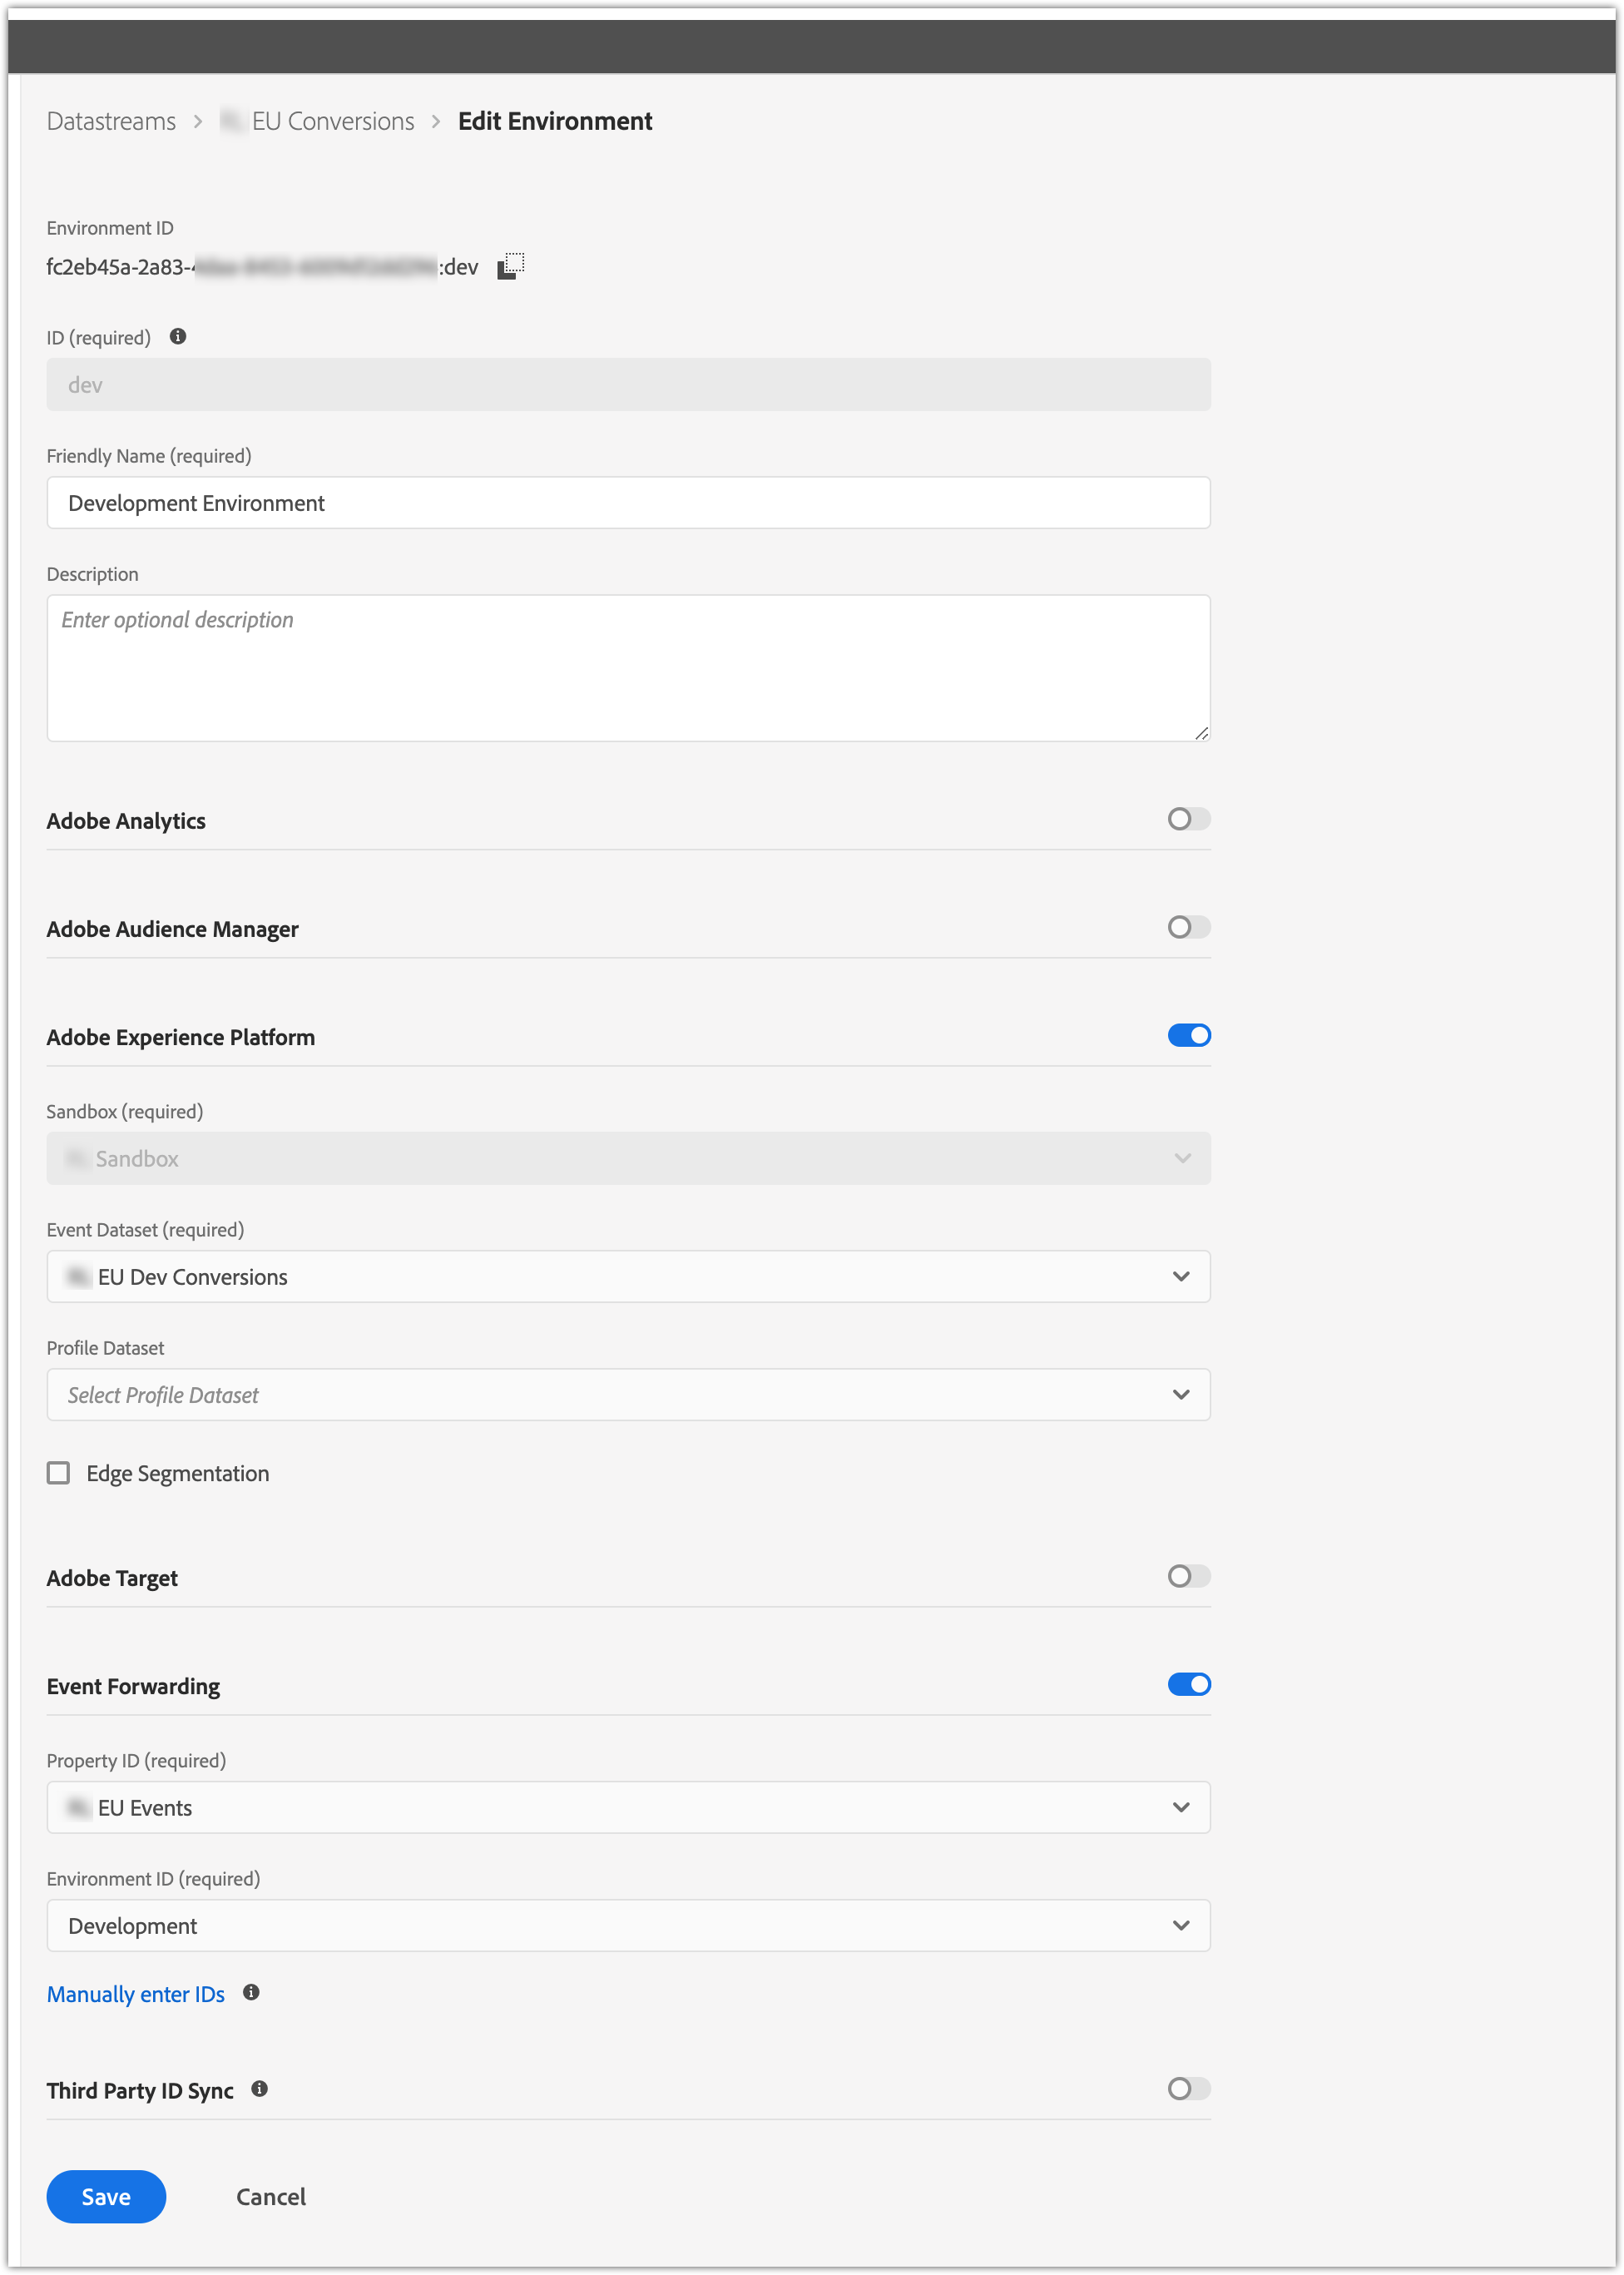
Datastreams are a bit like the environments in Launch; so you’ll get a Development, Staging and Production stream configured, with a slightly different Environment ID. This is where you configure what is going to happen to incoming messages. For each stream you can configure whether to send data to Analytics, Audience Manager, Experience Platform (using the Dataset you set up in the previous step), Target, Event Forwarding or Third Party ID Sync (used by Audience Manager, Ad Cloud and Customer Data Platform).
You’ll need to make a note of the environment ID as this is what needs to be embedded in to your site code when the server side call is made.
For our implementation we enabled Adobe Experience Platform and Event Forwarding. The AEP configuration should point to your Sandbox and Dataset that you have just configured. This then gives a way to monitor and debug that the events are being triggered. The Event Forwarding configuration points to the “server side Launch” configuration, where you are going to set up the third party API calls.
Adobe Experience Platform Data Streams user interface
Page Code to Send the Message
You then need to add code to your site to pass the message from the page to the Datastream. You’ll need the Adobe Web SDK and to configure it with your Adobe Org ID, the Config ID (your Datastream environment ID), the Edge Domain (we used the same domain we have set up for the Analytics Tracking Server) and the Adobe SDK URL.
Once you’ve imported and configured the SDK code, you need to add the event calling code to your page. How you do this will depend on your site language and set up, but some pseudocode for an example order confirmation call follows:
alloy("sendEvent", {
        "xdm": {
            "_clientSpecificFieldGroup": {
                "basketSize": dataLayer.basketSize,
                "productIDs": makeArray(dataLayer.order.item, "productID"),
                "productNames": makeArray(dataLayer.order.item, "productName"),
                "conversionURL": request.httpURL,
                "conversionTimestamp": currentTime
            },
            "commerce": {
                "order": {
                    "purchaseID": dataLayer.order.orderID,
                    "currencyCode": dataLayer.order.currencyCode,
                    "priceTotal": dataLayer.order.orderTotal
                }
            },
            "productListItems": [
                {
                    "SKU": dataLayer.order.items[0].productSKU,
                    "_id": dataLayer.order.items[0].productID,
                    "name": dataLayer.order.items[0].productName,
                    "priceTotal": dataLayer.order.items[0].productPrice,
                    "productAddMethod": dataLayer.order.items[0].productFindingMethod,
                    "quantity": dataLayer.order.items[0].productQuantity
                },
                {
                    "SKU": dataLayer.order.items[1].productSKU,
                    "_id": dataLayer.order.items[1].productID,
                    "name": dataLayer.order.items[1].productName,
                    "priceTotal": dataLayer.order.items[1].productPrice,
                    "productAddMethod": dataLayer.order.items[1].productFindingMethod,
                    "quantity": dataLayer.order.items[1].productQuantity
                }
            ]
            "_id": generateUUID(),
            "identityMap": {
                "Emails": [
                    {
                        "id": dataLayer.customer.hashedEmail,
                        "primary": false
                    }
                ]
            },
            "eventType": "commerce.order",
            "timestamp": currentTime
        }
    });
The alloy object is the Adobe SDK object. The top level XDM object is the top of the schema and the objects inside of it refer to the field groups within the schema. The data can be populated using the code/variables that would be used to populate the data layer object which is then pushed to the page.
Event Forwarding
Event Forwarding is the part which then passes the information from Adobe to the third party, and is effectively the equivalent of the tagging set up. The interface in Data Collection is very similar to the Launch interface. You create Data Elements (but base them off the XDM object in the message rather than your data layer), Rules with Events, Conditions and Actions, and do it all in Libraries in different environments.
First you’ll need to add a couple of extensions. Core is the equivalent of the Launch Core extension, containing useful JS functions and Adobe Cloud Connector, which contains the actions to enable sending data to third parties. Neither of these have any configuration options.
Create a data element for each item in the schema that you will want to pass on to the third party. This can use standard dot notation, based on the JSON object that you created in the site code above, and starting with arc.event.xdm:
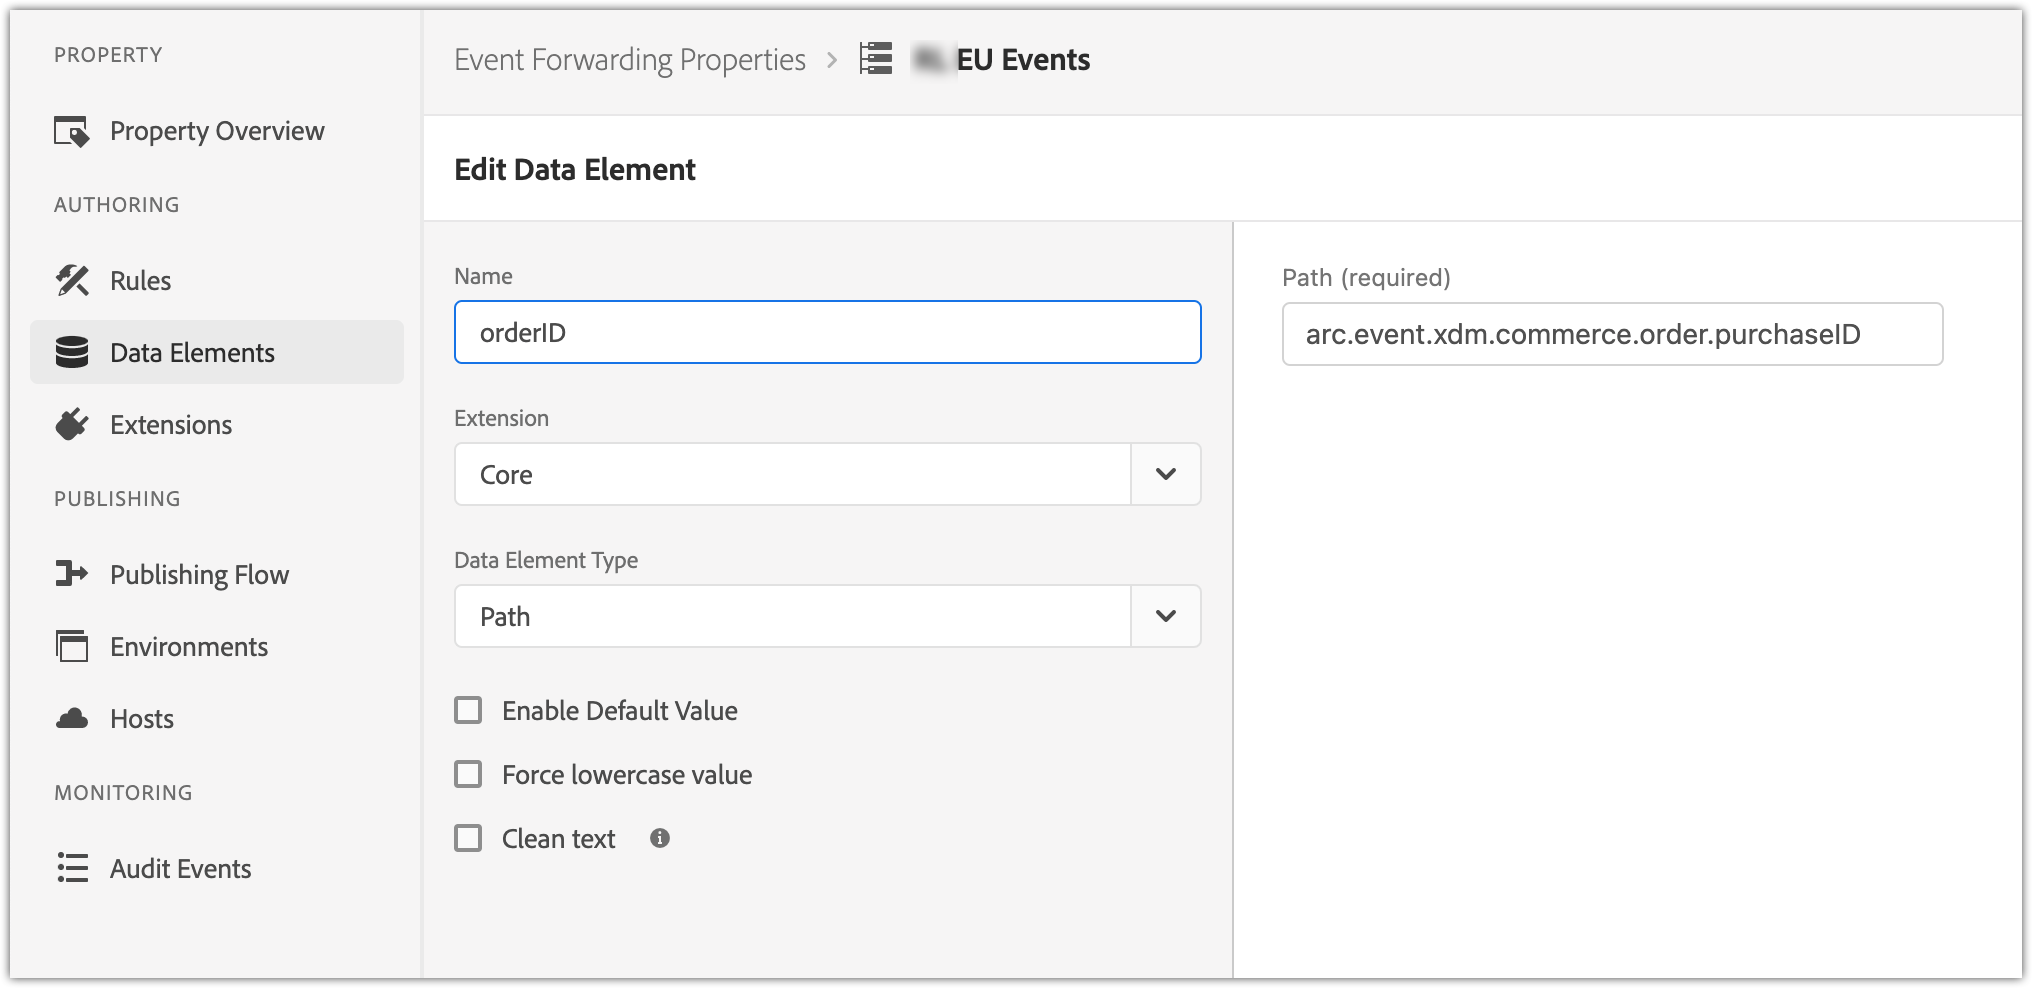
Adobe Experience Platform, Edit Data Element user interface
You can also use the Custom Code type, using standard JavaScript, and with access to the arc.event object.
Building rules is very similar to Launch. There is no longer an Event to set up – the event is the arrival of the event message. You can add conditions, checking for certain things in the message, again using the arc.event object, or using the Data Elements that you have just created.
The available Actions are either Custom Code or the Adobe Cloud Connector’s Make Fetch Call (call an API). Custom Code is available for manipulating the message. The return value of this code will be added to a new object in the arc object that is passed to the next action. This will be available in an object arc.ruleStash.core.customCode.{keyName}, where {keyName} is configured per action.
The Make Fetch Call interface is something similar to Postman, and enables you to set up a third party API call, configuring the method, URL, query parameters, header and body.
Set up the API call with an appropriate body (we used Postman to do all the testing here and then just copied the structure over). Notice the data elements are referenced using double curly brackets, rather than the percent signs that Launch uses.
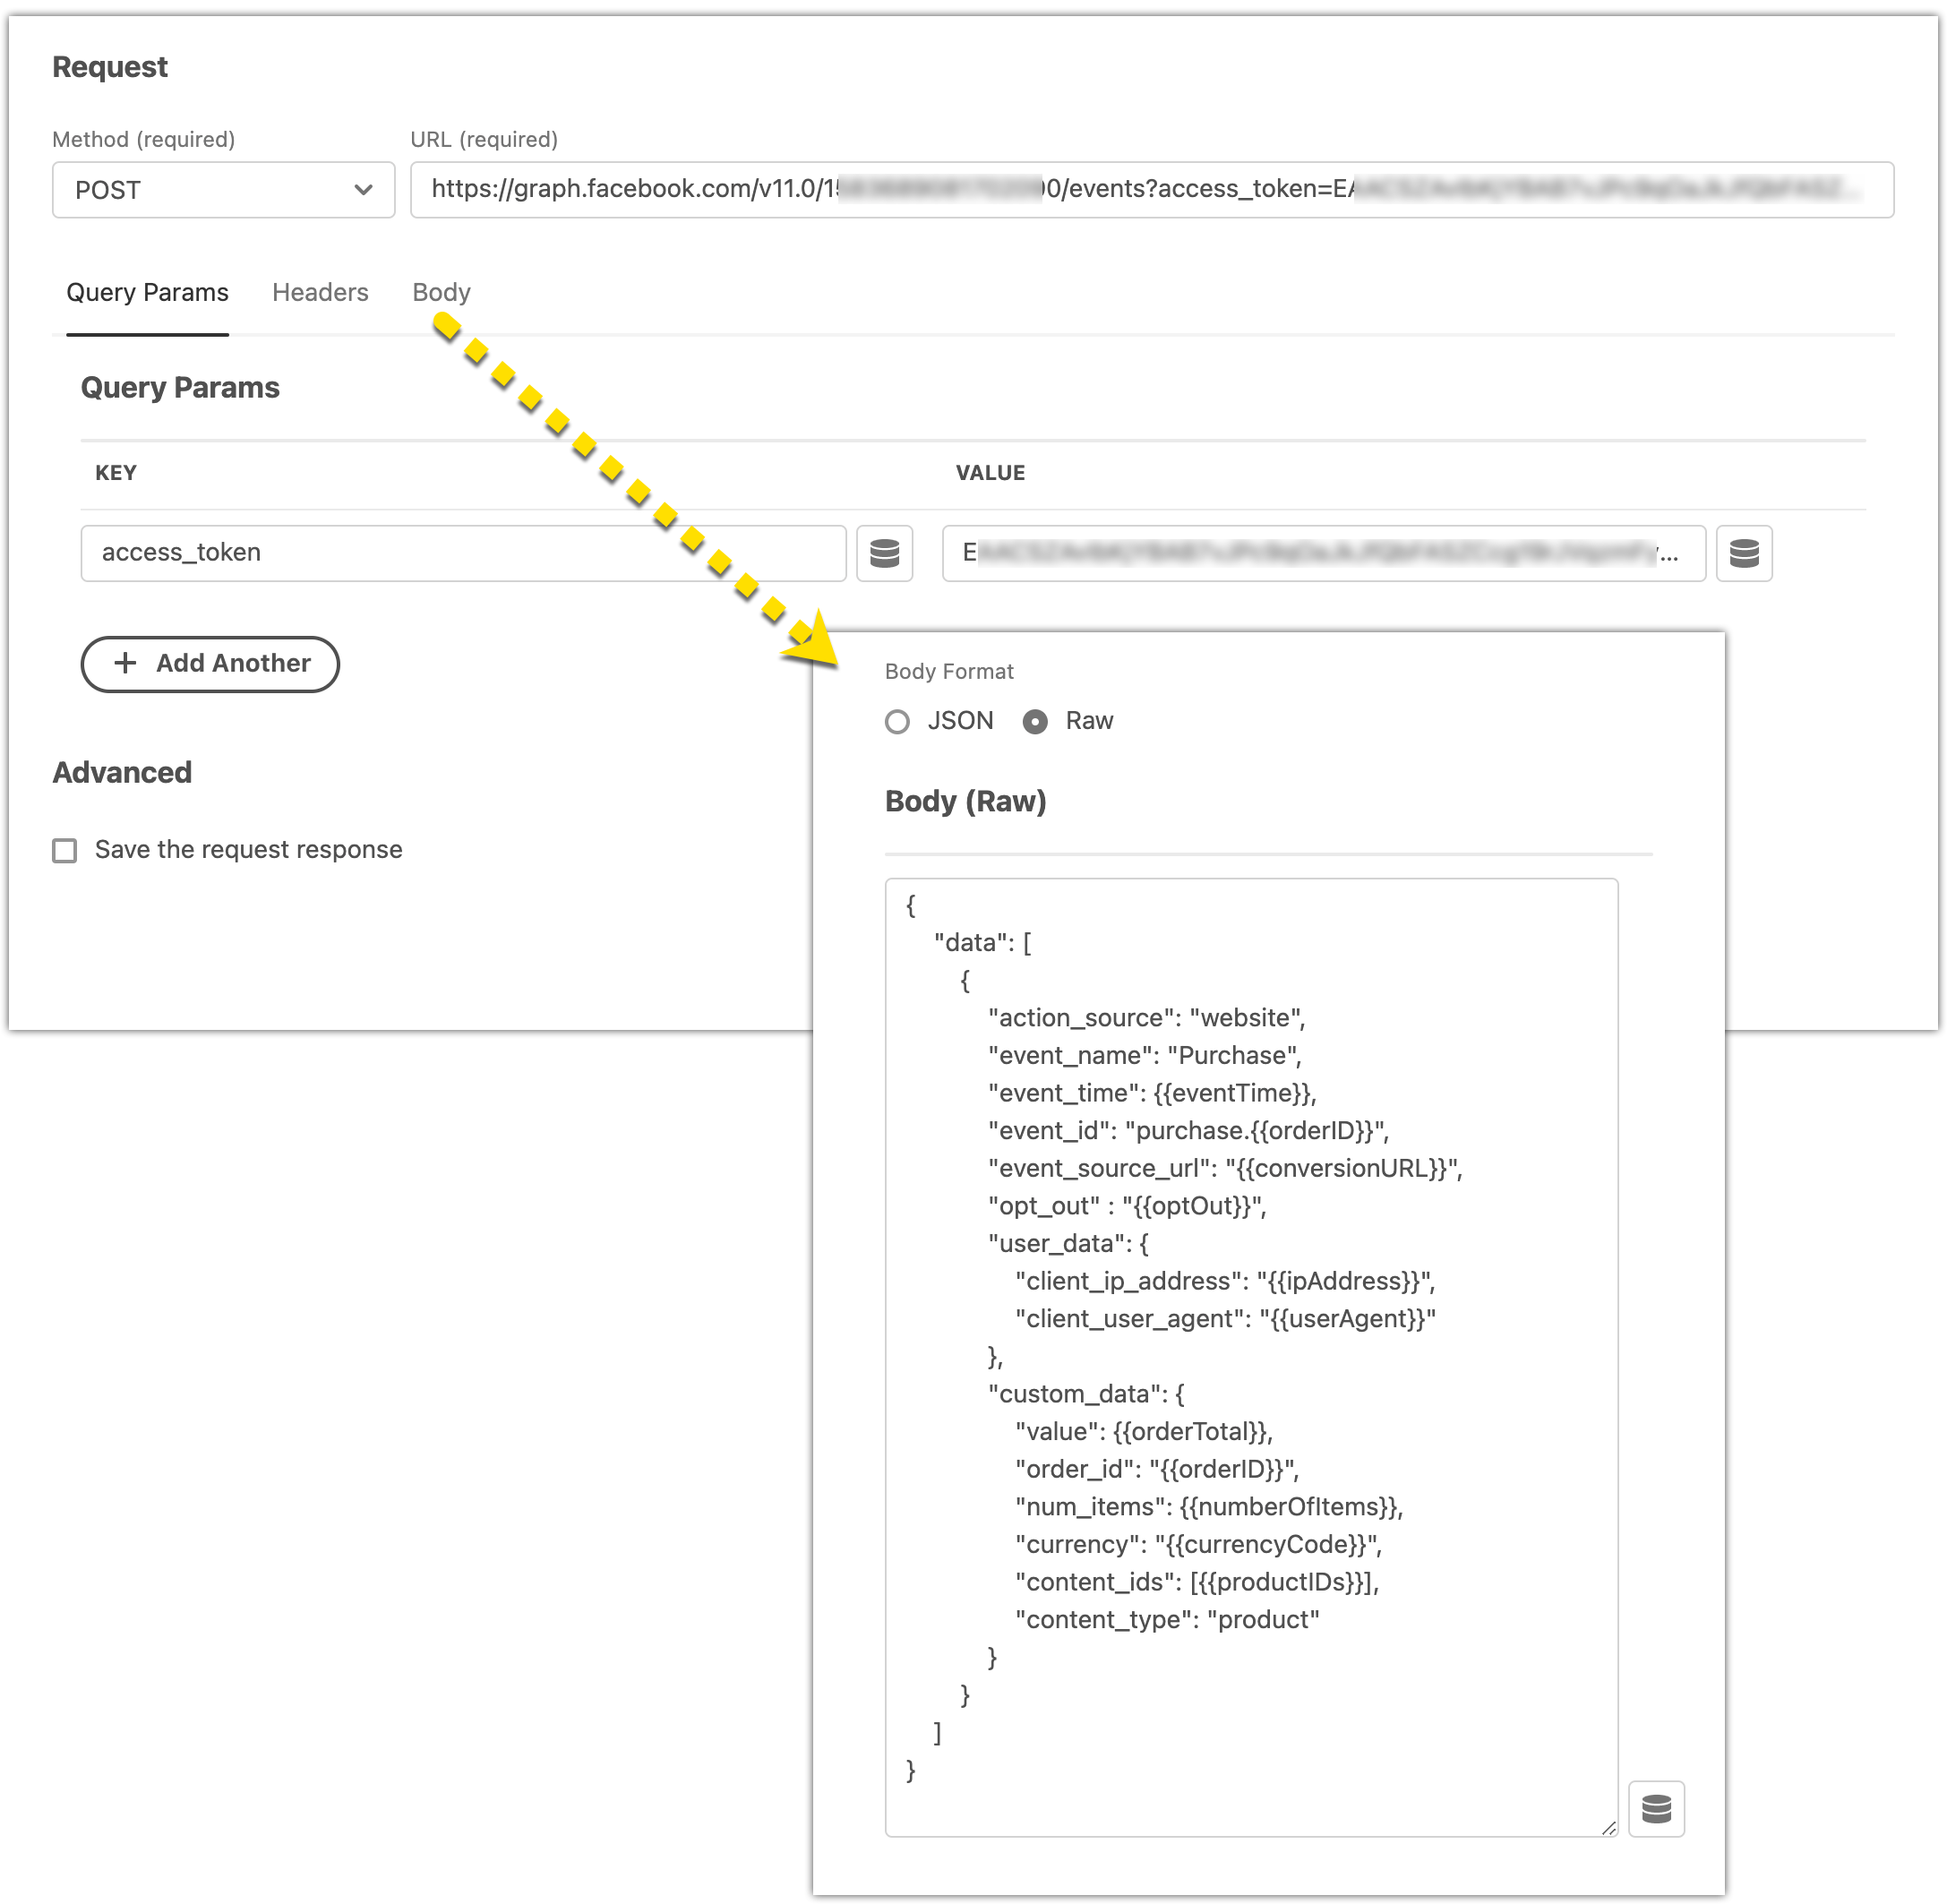
Make Fetch Call user interface
Save and Build the library, and you’re good to go!
Testing and debugging
Testing is the tricky bit, because (and the clue is in the name) the request is sent from server to server. This is where the AEP part of the set up comes in; as well as passing the message on to the third party, we are also capturing it in AEP. Additionally, and most usefully, you can use the Adobe Experience Platform Debugger Chrome extension to capture the logs from the Adobe Edge Network.
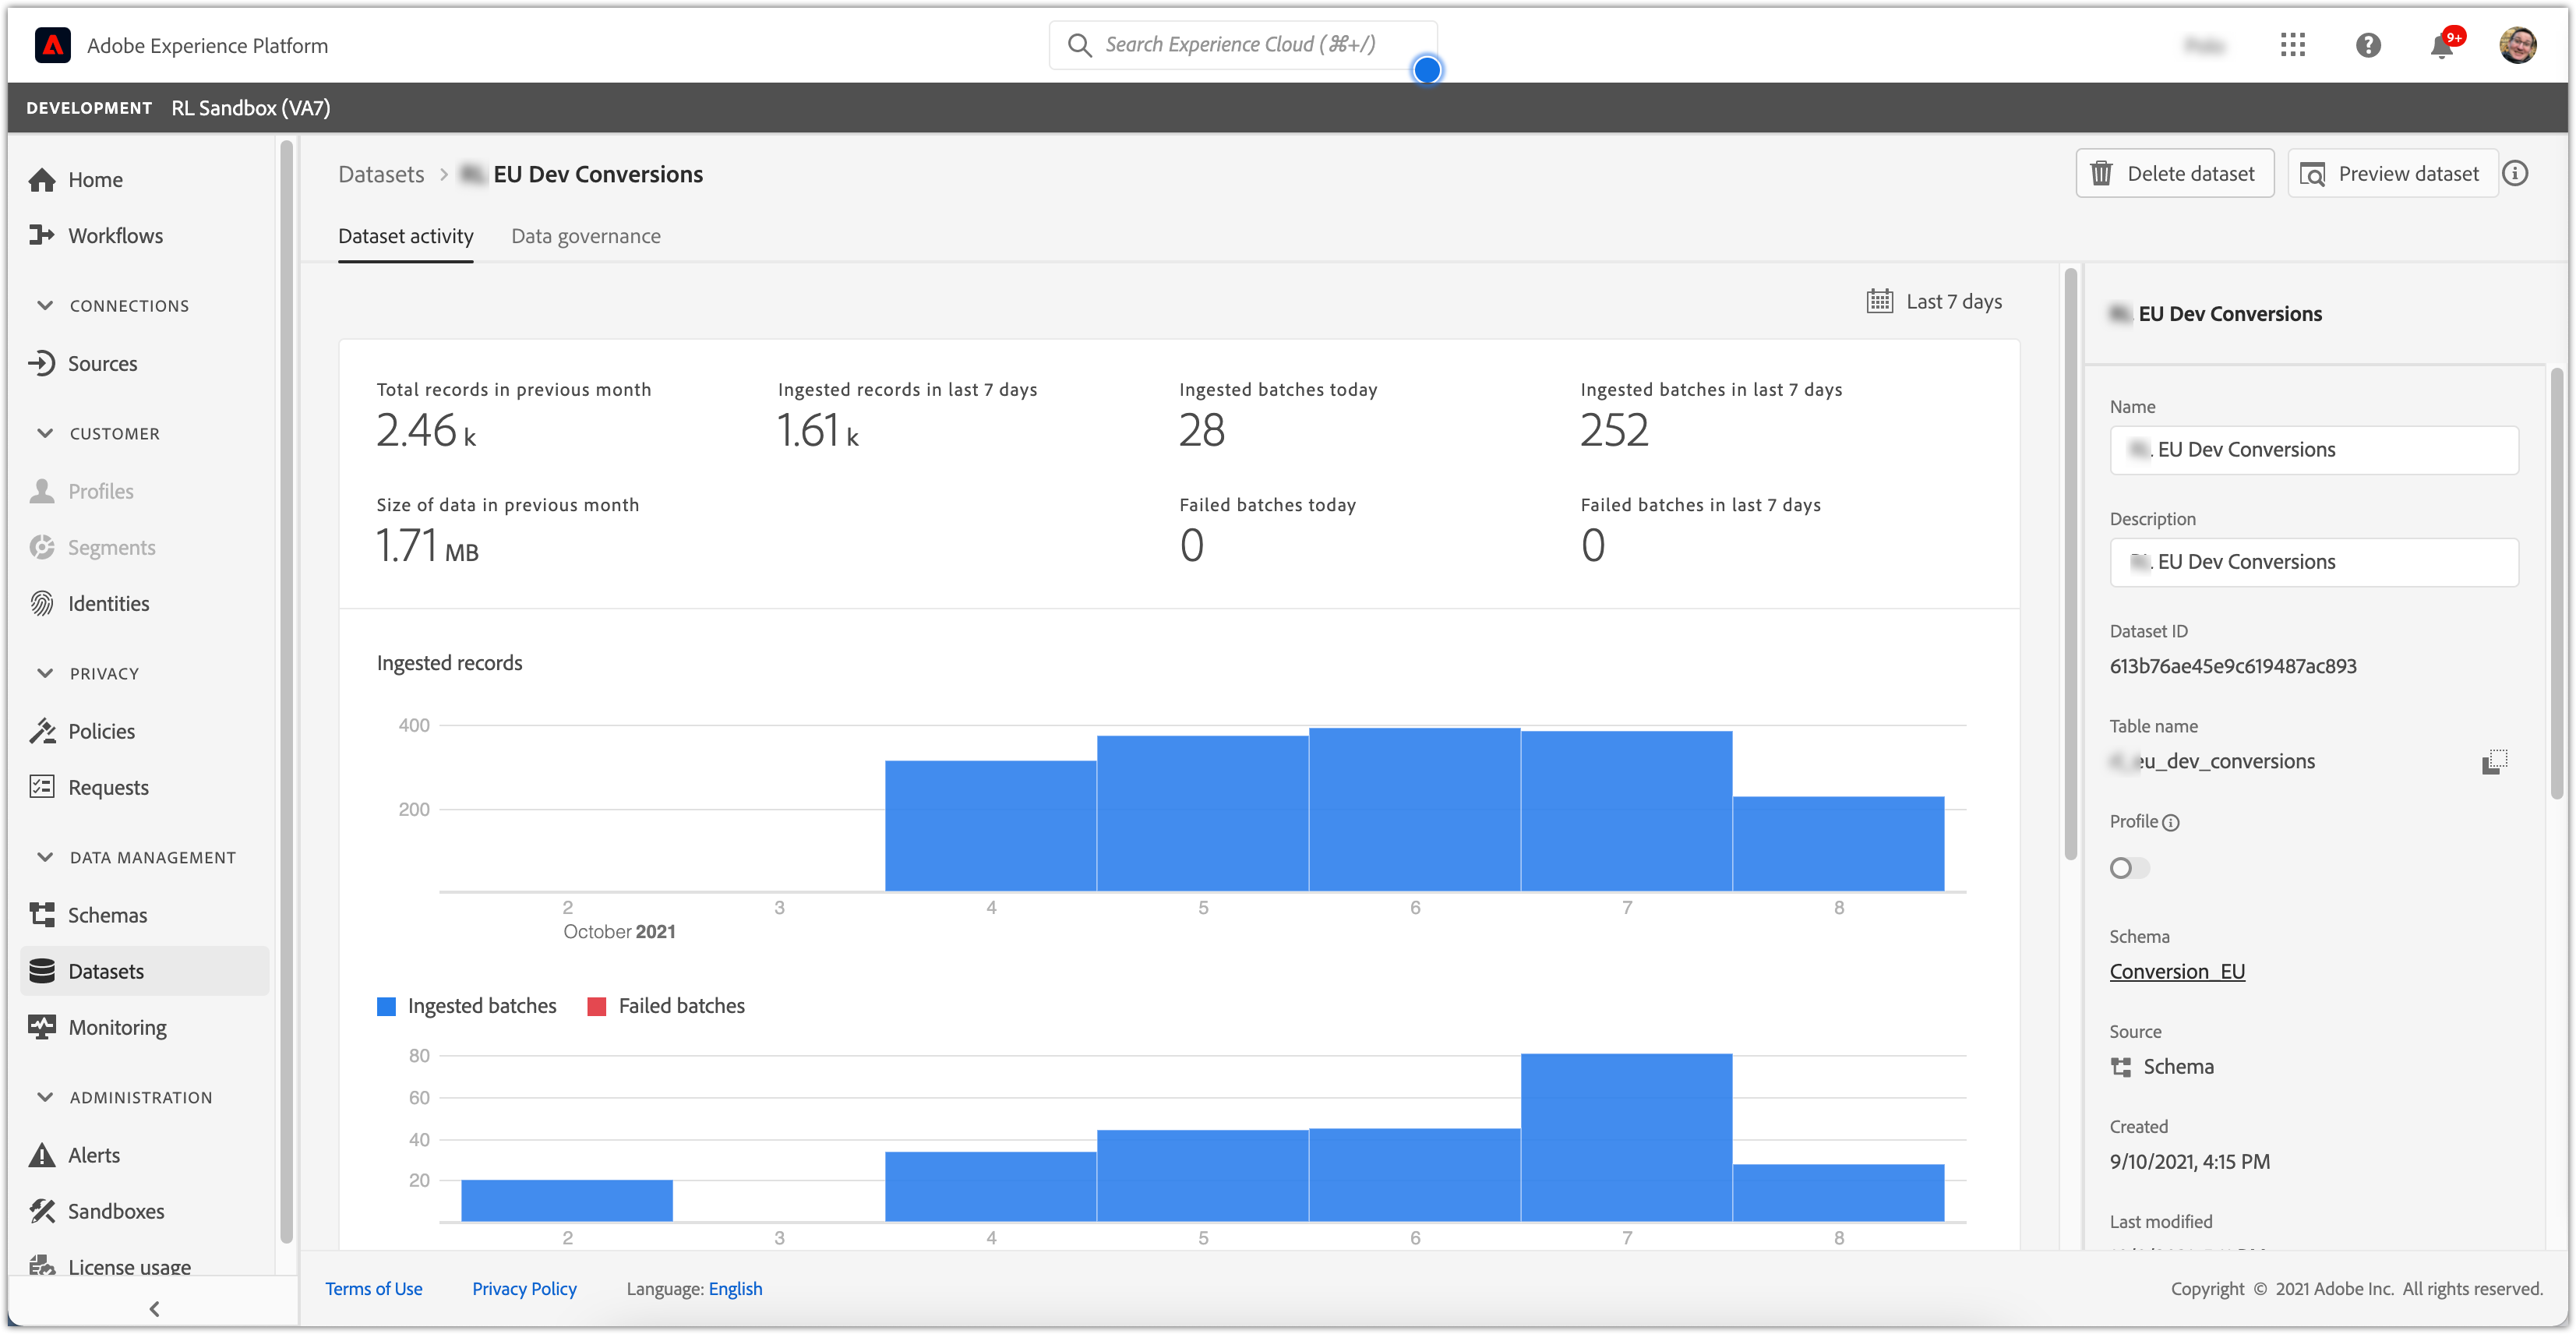
Opening the Dataset view in AEP gives you a log of the transactions that have been ingested. Finding specific items in this list can be problematic; there is a capability to query the events using an event id, but that is a separate (paid for) product. Without it, you can preview the data in a given batch and then scroll through looking for the relevant events (in our case, with event type “commerce.purchase”).
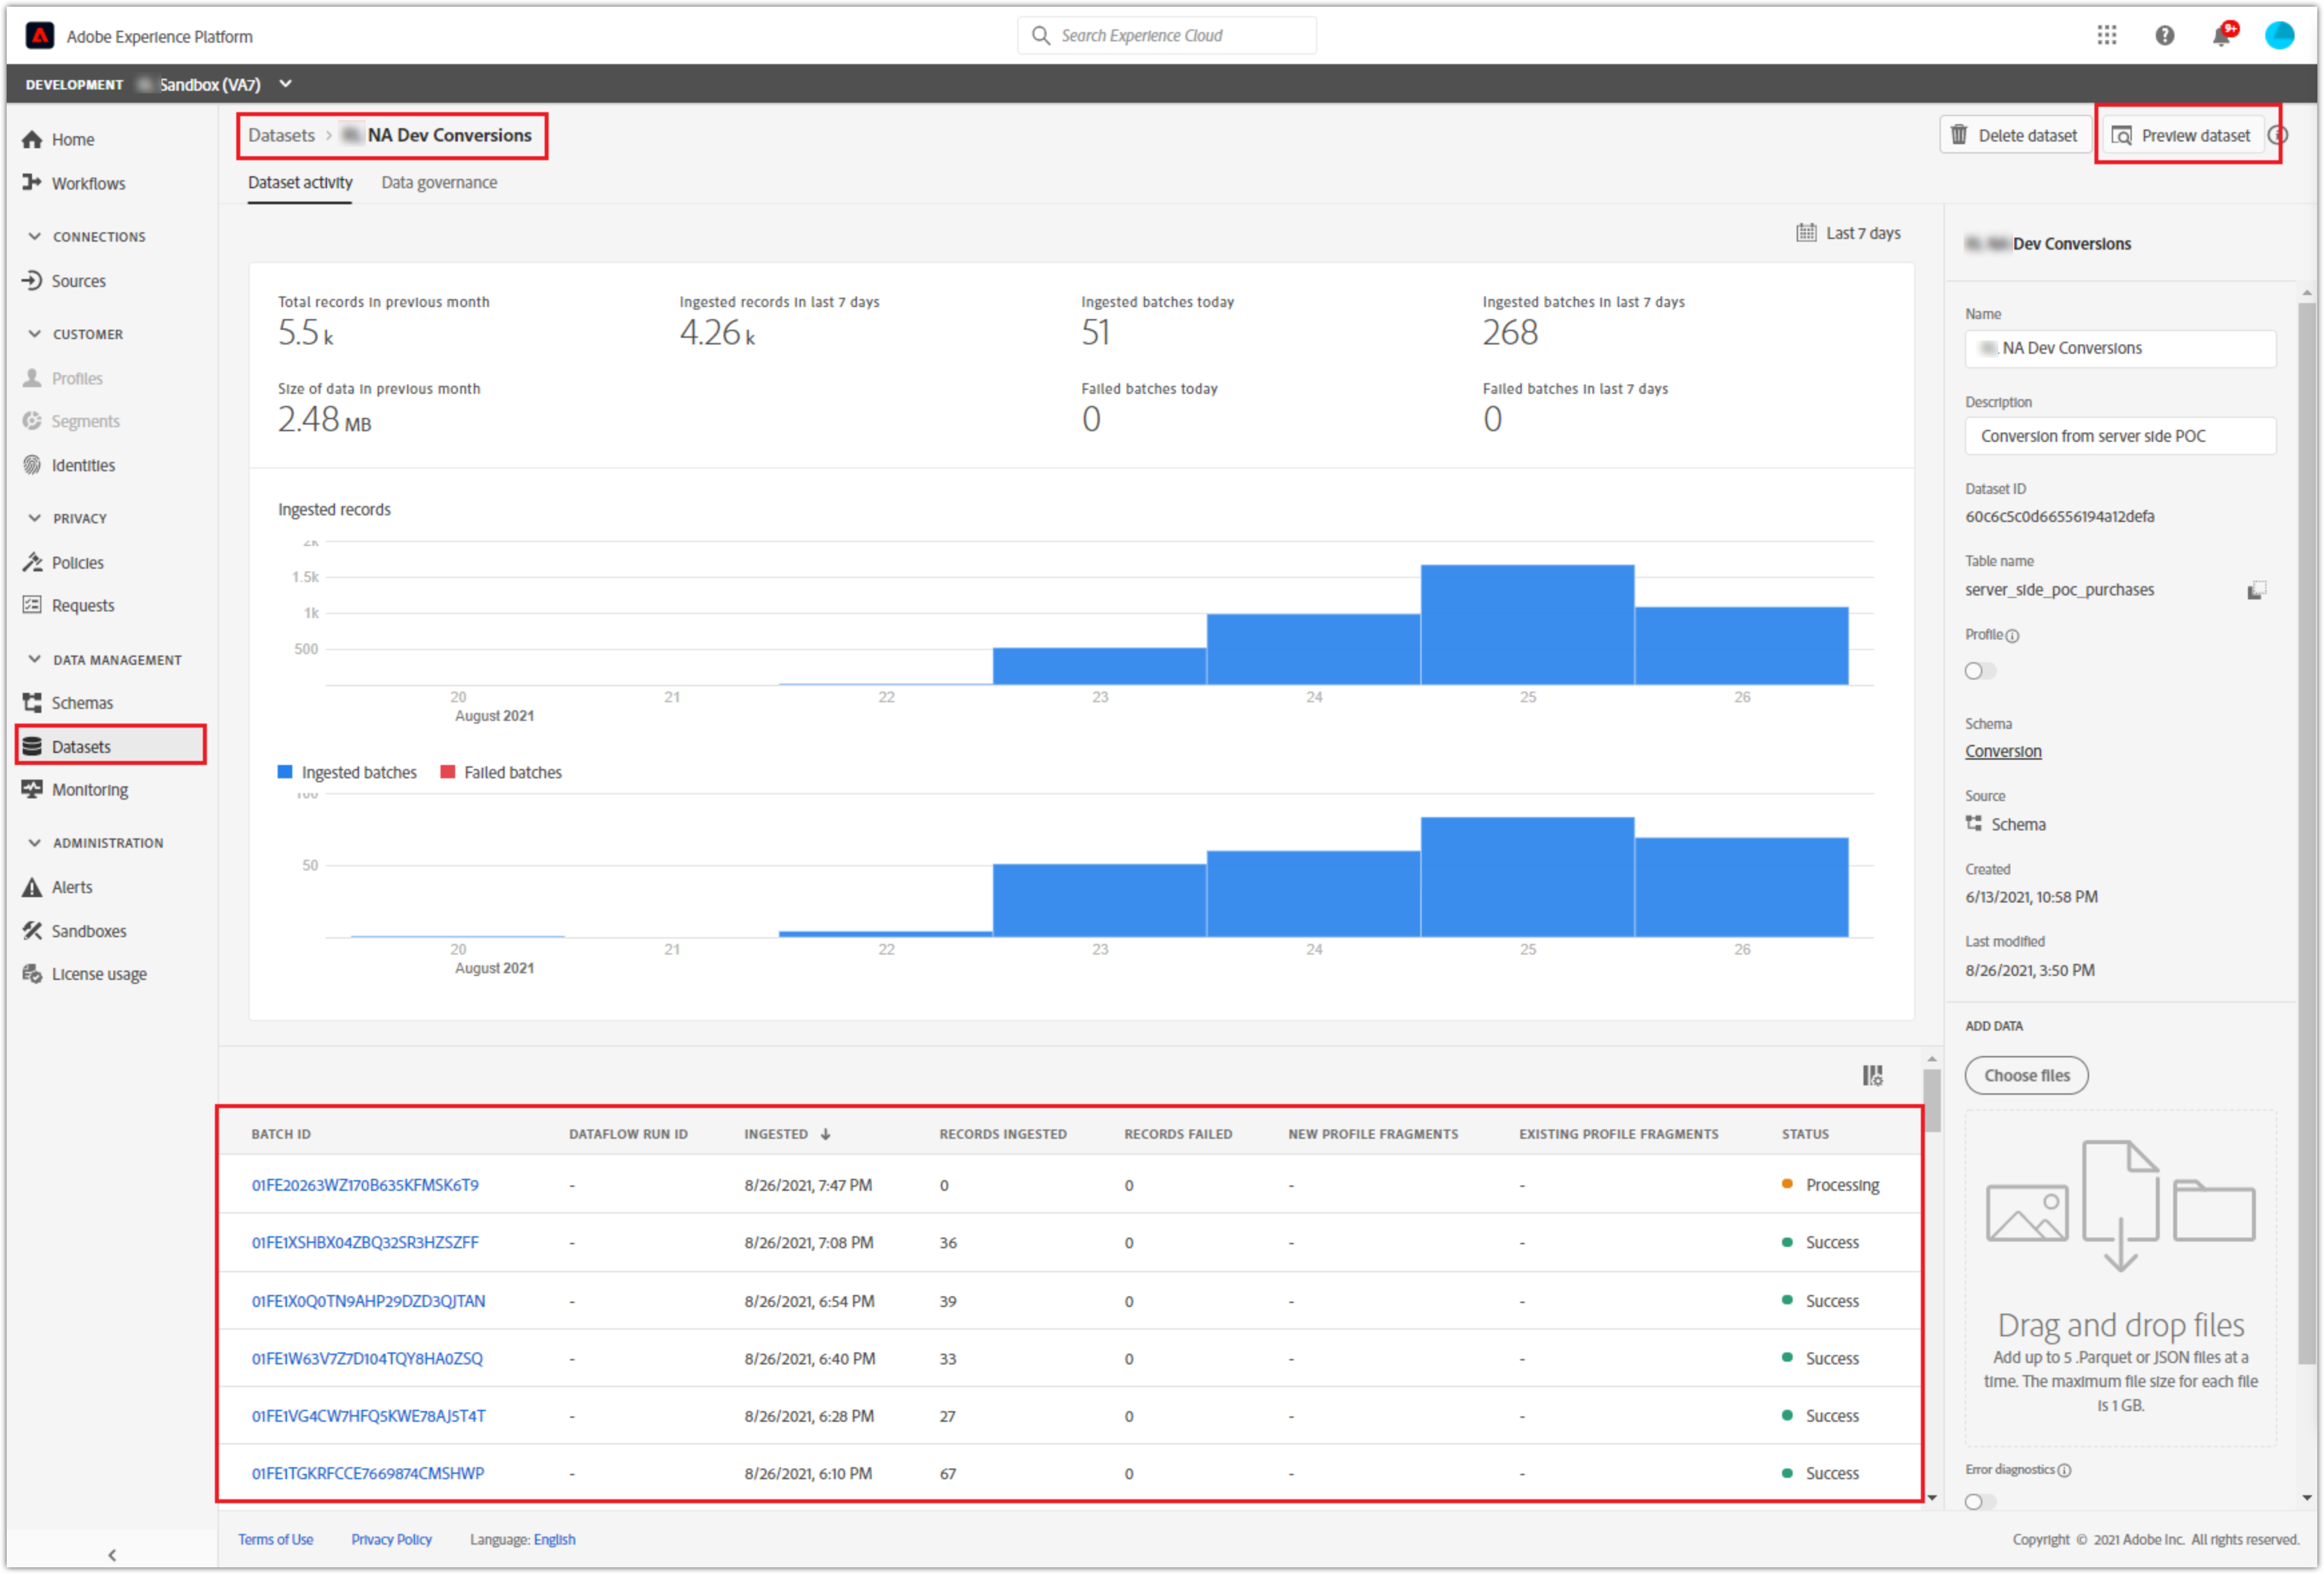
AEP testing and debugging illustration

AEP testing and debugging illustration
Using the AEP debugger and Edge Logging is much easier.
Open the AEP debugger extension and sign in using the button in the top right. Click on Logs in the left hand menu, select the Trace tab in the main screen and click Start Trace. Browse through the site and trigger the event and you’ll see the logging from Data Collection / Launch, including the message to the third party and the response back.
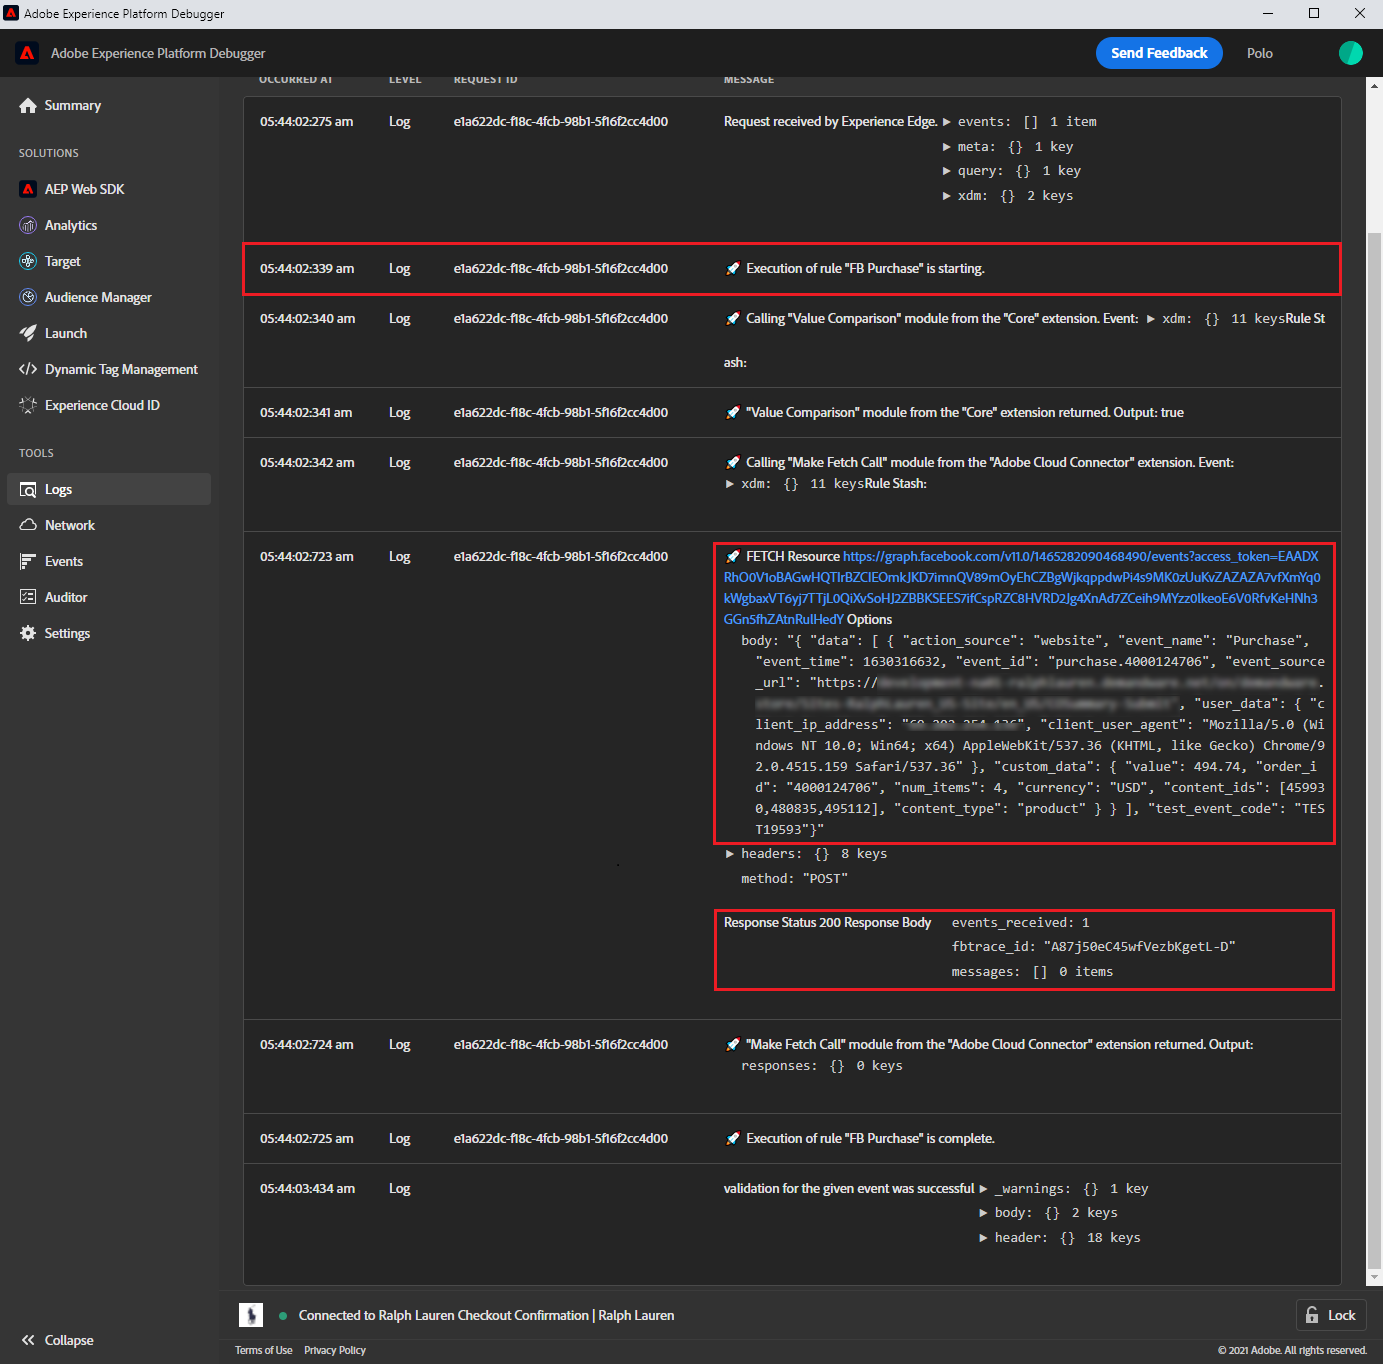
AEP testing and debugging using the Adobe Experience Platform Debugger
As you can see, the full JSON message is displayed in the logs, so you can check that the data is correct. Remember this message is the one built in Data Collection (Launch), so is reasonably easy to modify and rebuild, if required.
In this case we were sending to Facebook, so we were able to add a testing parameter to the end of the message and then use the Facebook Business Manager test event screen to see events appearing in real time.
Publishing
Publishing is a bit tricky. We built the schema, dataset, and datastreams in a Sandbox environment, and to publish this to the production environment requires an API project to be set up and configured, which is a bit fiddly. Maybe I’ll cover that in another post.
Implementation Next Steps
Server side tracking takes away some of the potential issues that come with relying on an “unknown” client browser to make sure analytics or order information is passed to different systems. While there is still a requirement for a browser, a single call to AEP with a single data payload as the page renders is likely to be far more reliable than sending multiple asynchronous requests after the page has rendered.
So what else could you do with this mechanism? Future projects that we will be looking at are:
Extending the message to include more order detail
Because this project was just to fire a Facebook confirmation tag, we only added the fields that Facebook requires to the message from the page. The first update is to extend the schema and message to pass a lot more information, and not just on the order confirmation page.
Pass order and return data to BI in real time
Rather than daily or hourly feeds from Adobe Data Warehouse or DataFeeds, we can pass the messages directly to the BI database with order, cancellation and return information at the point in time when the event happens. This will give more accurate data in the BI systems and also reduce the overnight processing required when a whole days worth of data is ingested.
Cookieless Tagging
Because the server side approach doesn’t require information held in the browser, it is easier to implement a cookieless approach. The requests being sent to third parties are not coming from the customer browser, so security concerns about cookies being passed on the HTTP request are removed.
Server Side Tagging – Final Thoughts
There are a lot of components to set up and a lot of small details that have to be correct before this works. But once configured, AEP gives a reasonably elegant way to remove calls from your client side JavaScript and push the load on to the server side processing. The schema/dataset/datastream approach, while initially it may seem like a lot of work, does give a robust framework and means you can be confident that the messages are likely to be well formed.
We have more work to do on the testing and debugging side, especially as we move towards a wider adoption of this approach. Our next step is take the two separate schemas we set up as part of this proof of concept and combine them into a Global schema that can be used for all client sites and all the messages. As the messages get bigger the testing may become that much harder, especially when there isn’t a nice console log option to see what is happening in the code. But the improvements in reliability should outweigh this.
Now the hard work of the initial set up and configuration is complete, we are well placed to extend the reach of this mechanism and start to move other tags, both analytics and marketing, on to this platform.
Ben Stephenson has worked as a consultant for 120Feet for five years. Before 120Feet he had ten years of development experience on ecommerce websites and five years of digital marketing experience as an ecommerce manager looking after a large multinational collection of websites for a Travel and Tourism company. He is an official Tealium Expert (with the polo shirt to prove it!) and spends most of his working days in Adobe Analytics, Adobe Launch and Tealium iQ.
In his spare time he plays guitar, goes cycling, builds Lego and takes photos. But not all at the same time.